
RelayPlan user documentation
Everything you need to run RelayPlan — a lightweight ERP for construction and project-based companies. This guide takes you from first login to first results: add users, create cost centers, enter stock, and start tracking hours and costs.
First login, users, cost centers, stock.
Entry methods, approvals, corrections.
Sign in and clock in from the field.
Get started with RelayPlan
Welcome to RelayPlan — a lightweight ERP for construction and project-based companies. Setting up takes a few steps, and you can start seeing results the same day.
First add your users, then create cost centers, and in the Warehouse module enter your key items. Once the basics are in place, teams can start recording hours and materials.
First login & profile

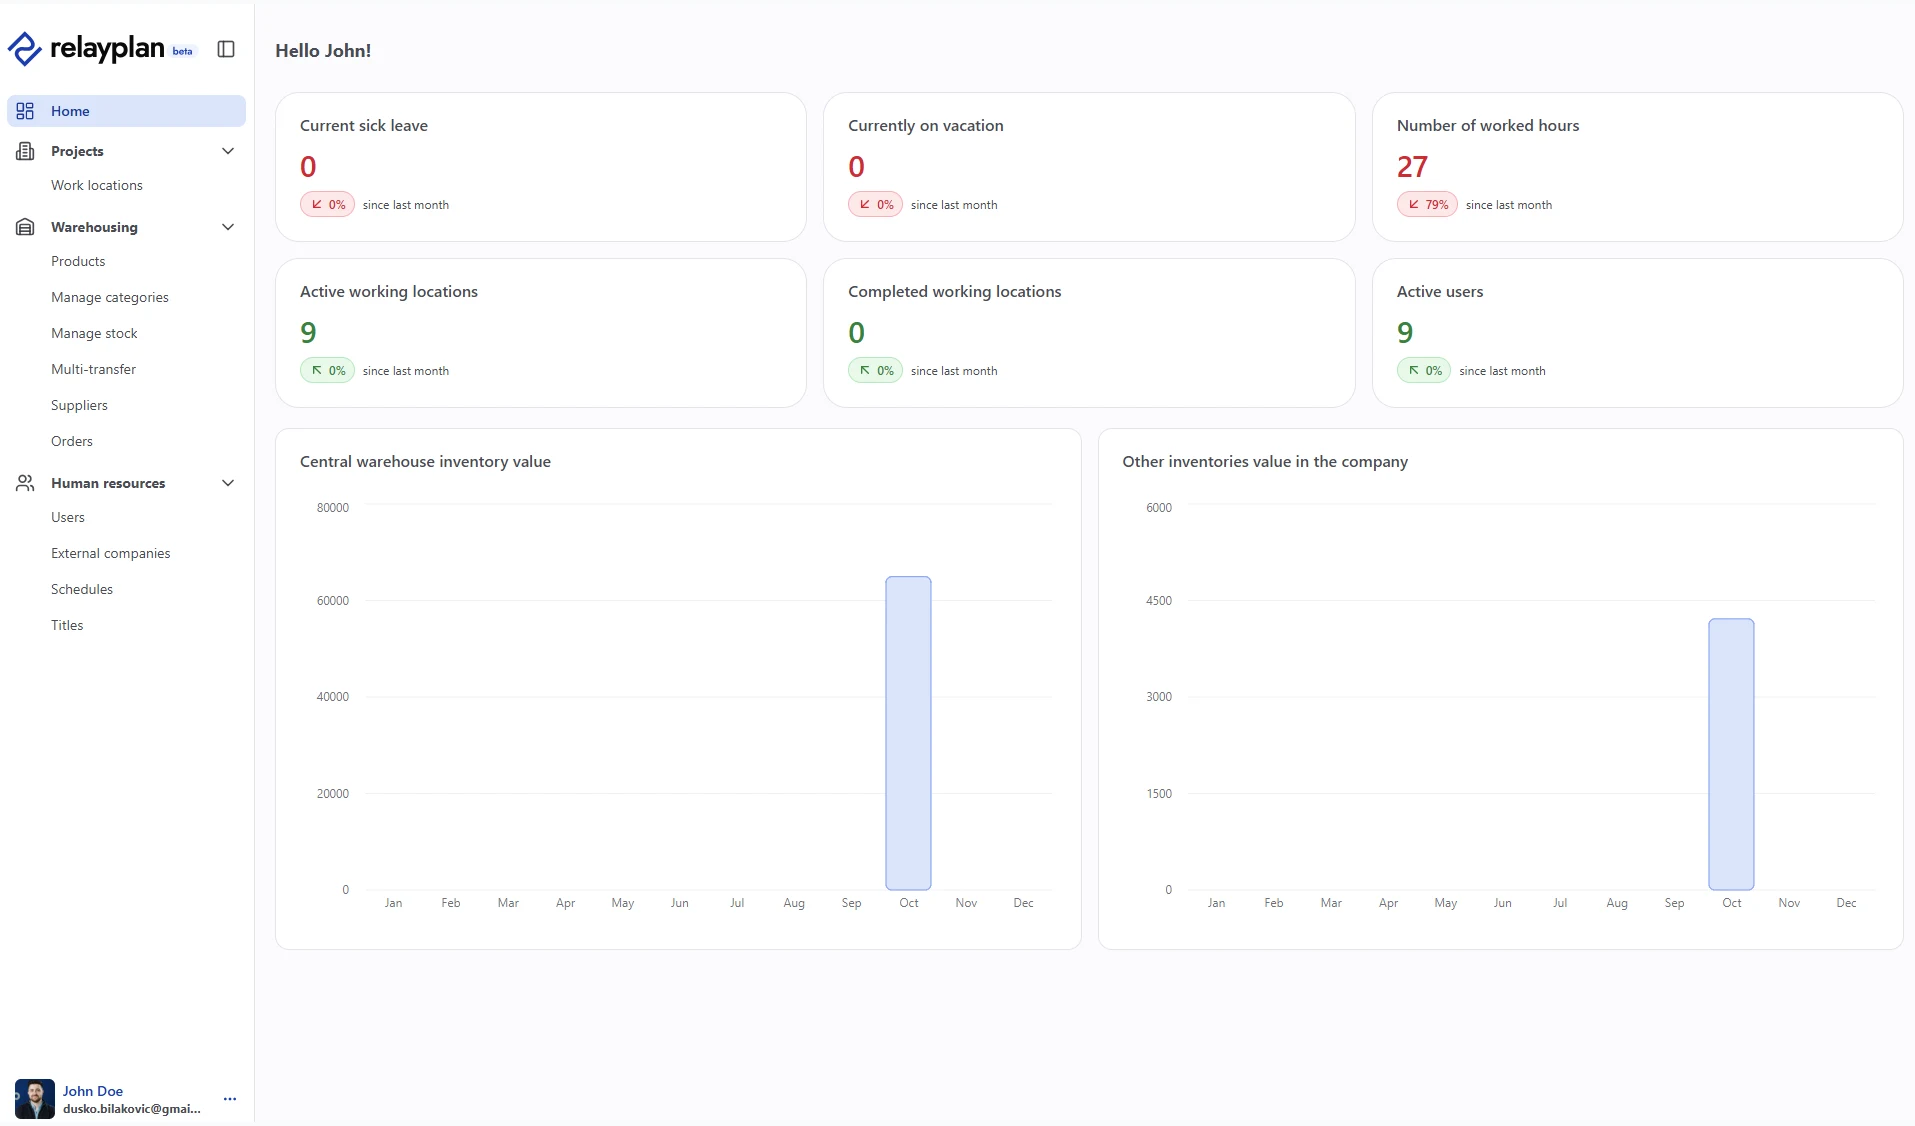
Navigation & interface
The left menu lists every module in the system. Which modules you see depends on your subscription plan and on the role assigned to your account.
The top bar holds search, notifications and your profile menu, while the central area always shows the module you currently have open.
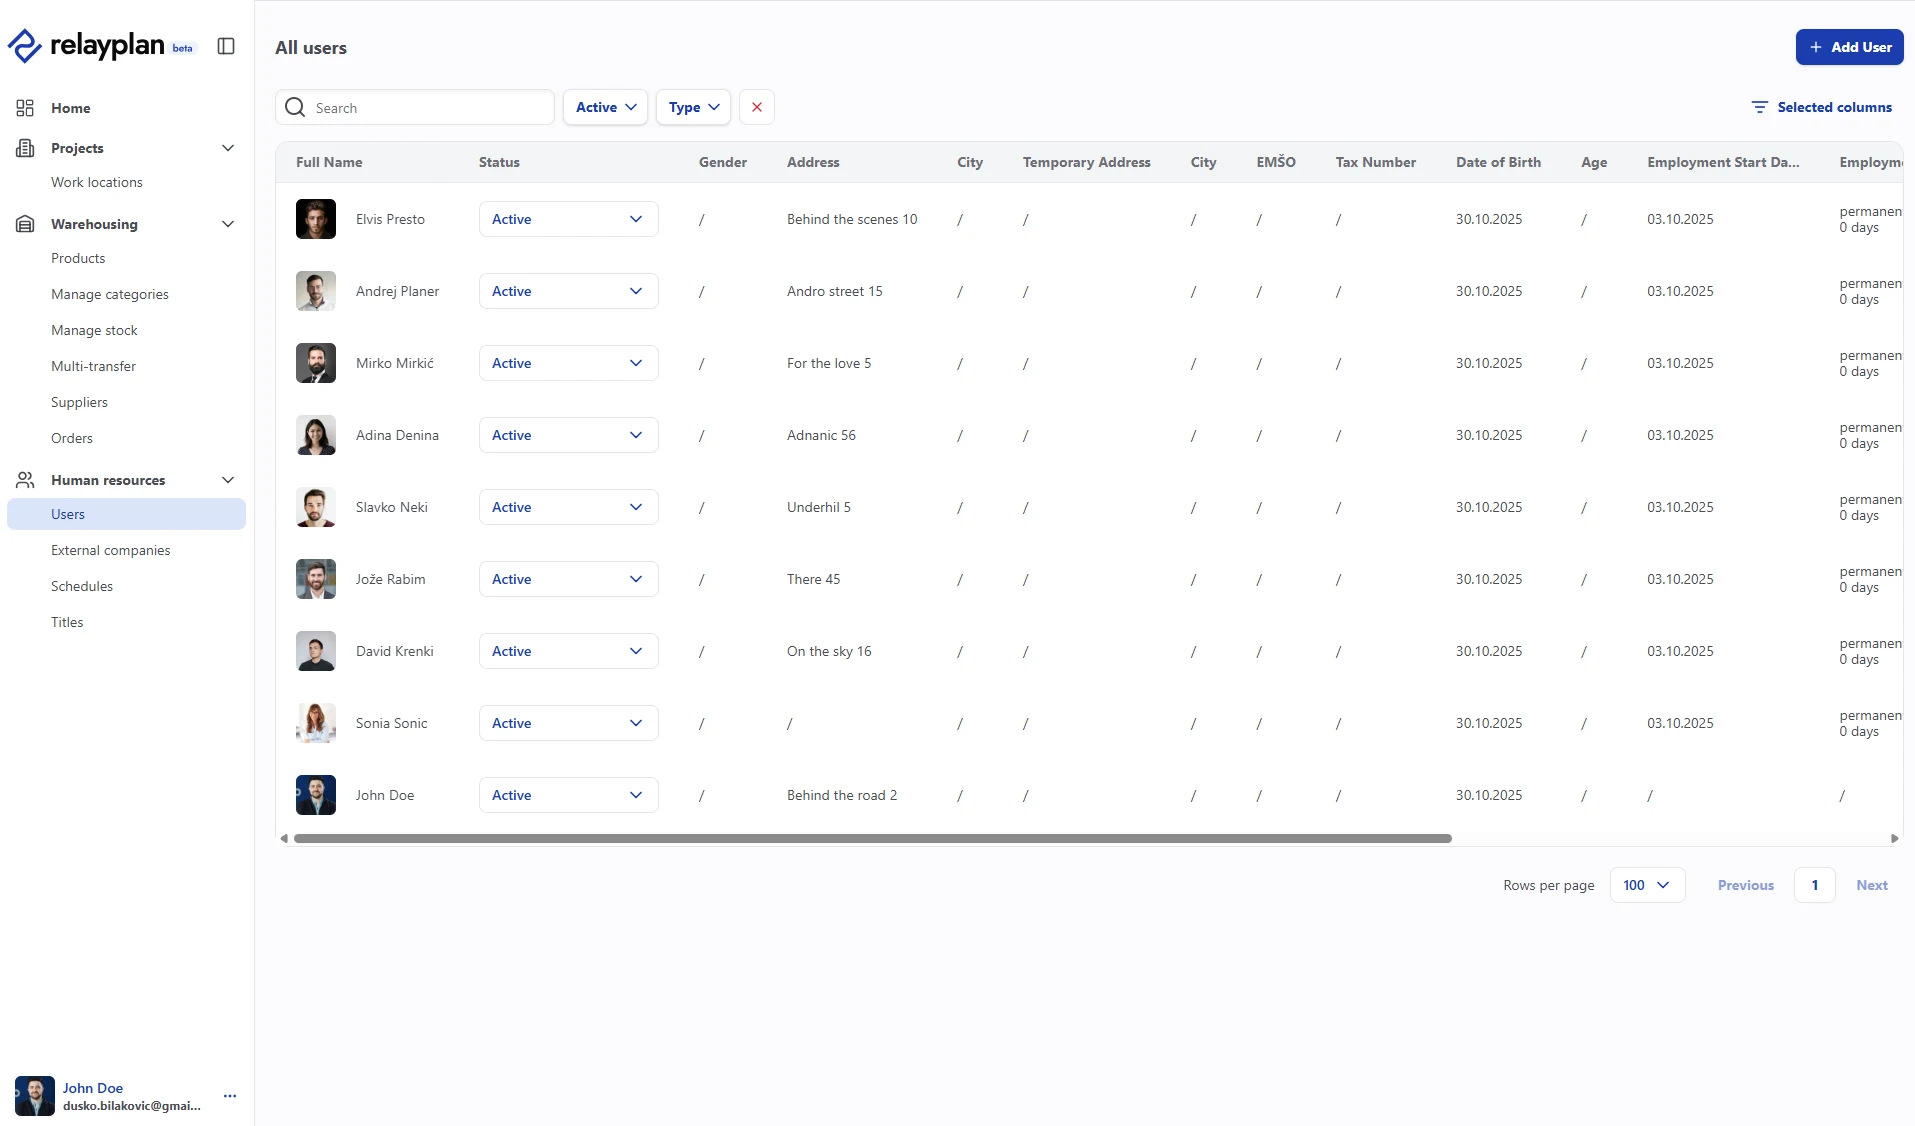
Users & roles
The HR module gives you a complete view of your team — from basic details, contracts, skills and roles through to availability, absences and work history. The system also records safety training, medical examinations and holidays.
Digitalising these processes removes time-consuming document searches, reminds you when documents are about to expire, and improves both legal compliance and internal organisation.
The Administrator role has full control, including granting and removing rights. One administrator cannot remove the rights of another administrator, or change their password.
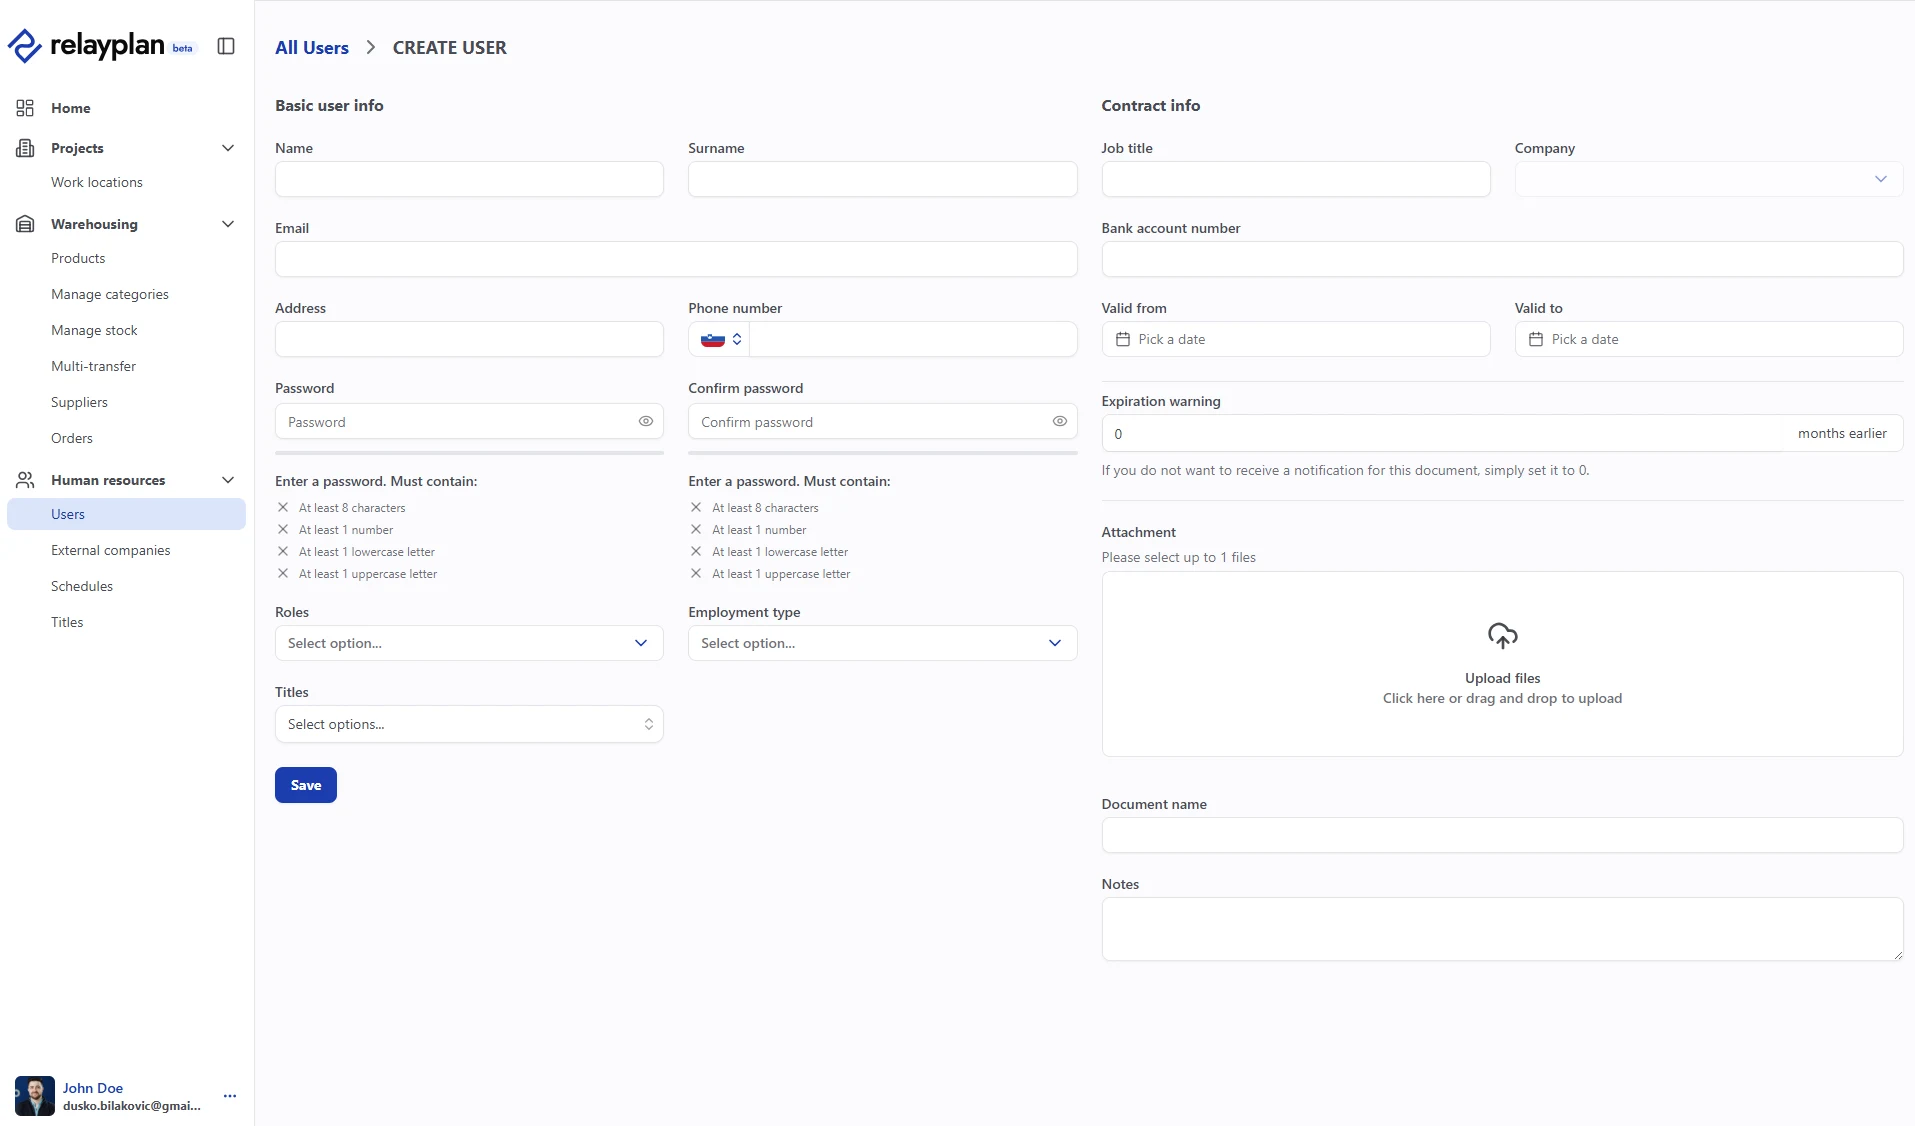
Add a user
Available roles
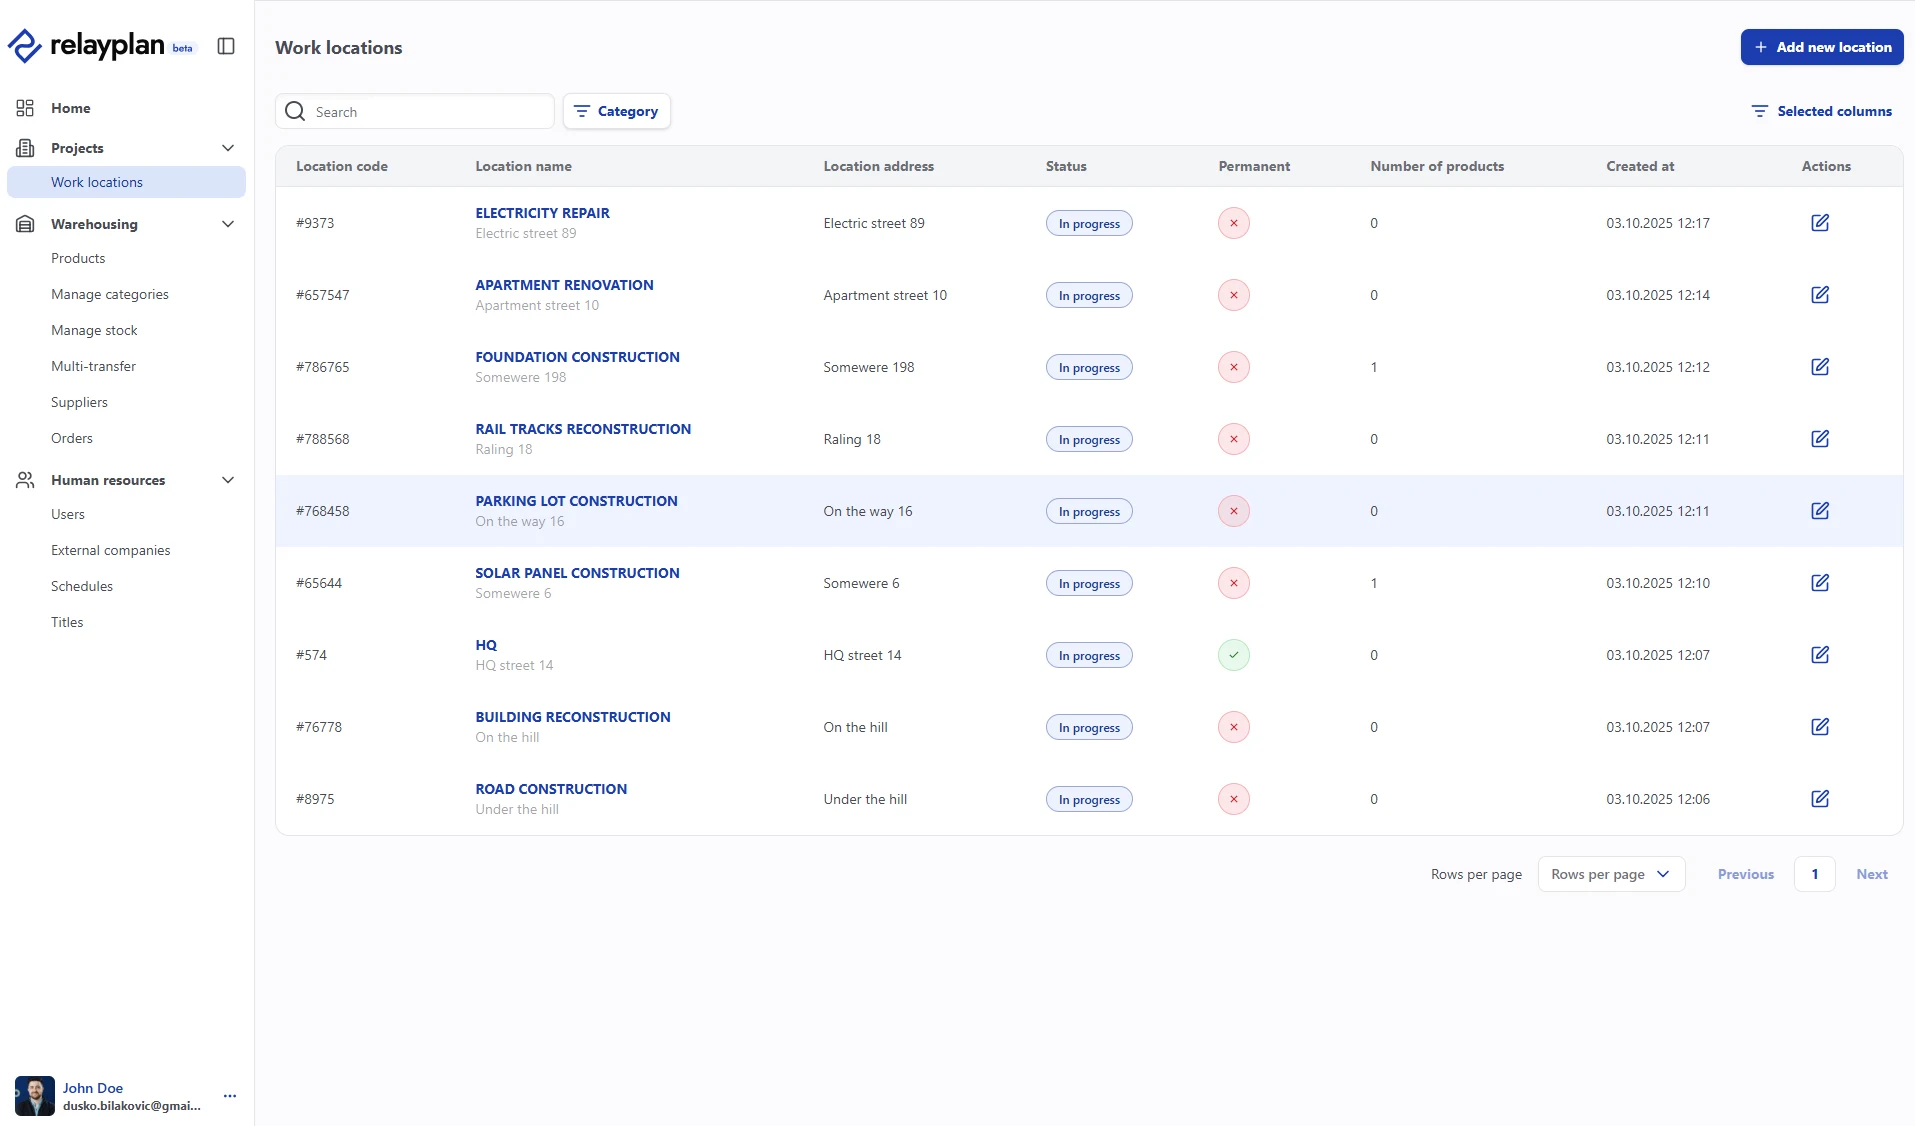
Cost centers (projects)
Every cost center or project has its own dynamics, deadlines, needs and costs. The projects module centralises all activity — from initial setup and allocation of stock and resources through to tracking costs, hours and inventory.
A cost center aggregates costs, hours and materials in one place. Give it a clear name so field teams recognise it instantly, for example FTTH – Vodnikova – 2025.
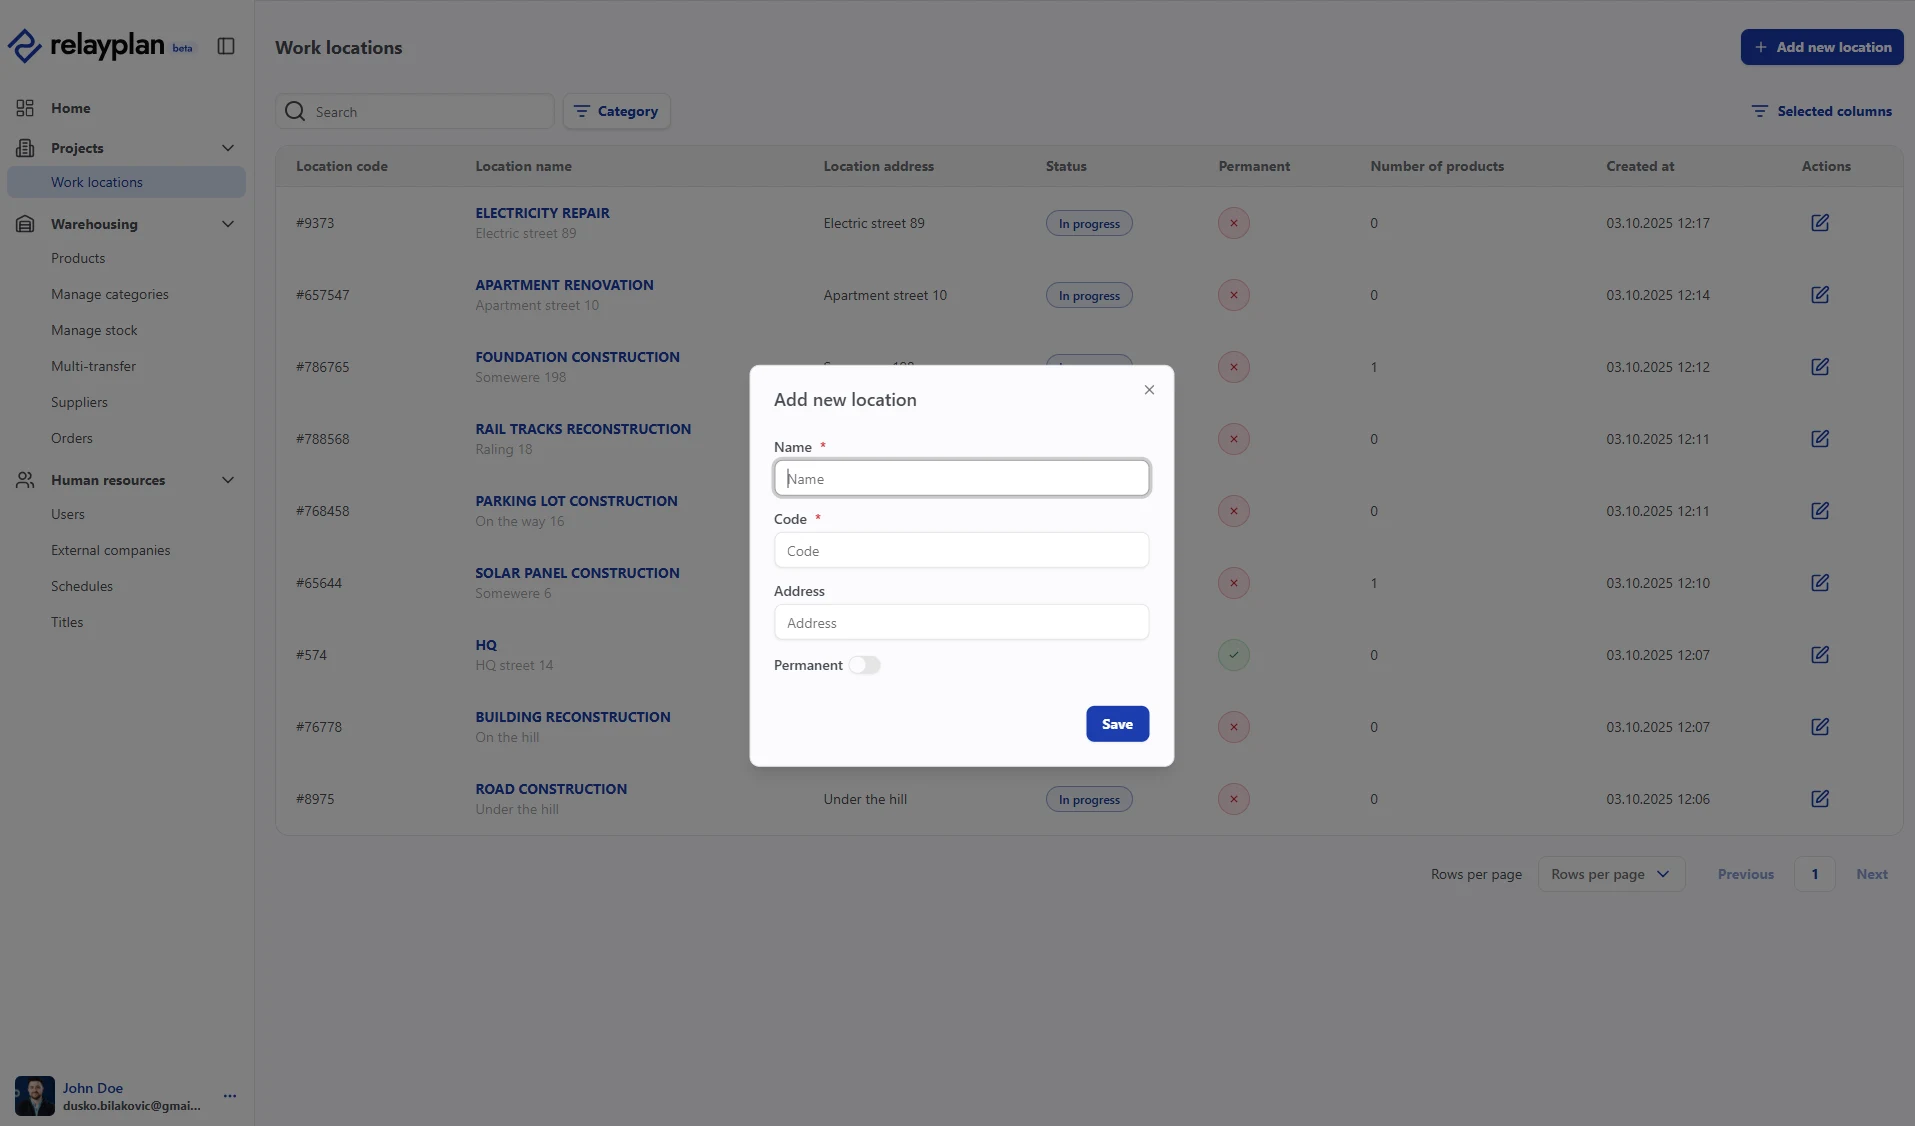
Create a cost center
A permanent cost center is ongoing rather than tied to a single job — an office, for example, where employees are always assigned. You do not need to reassign people to it each time.
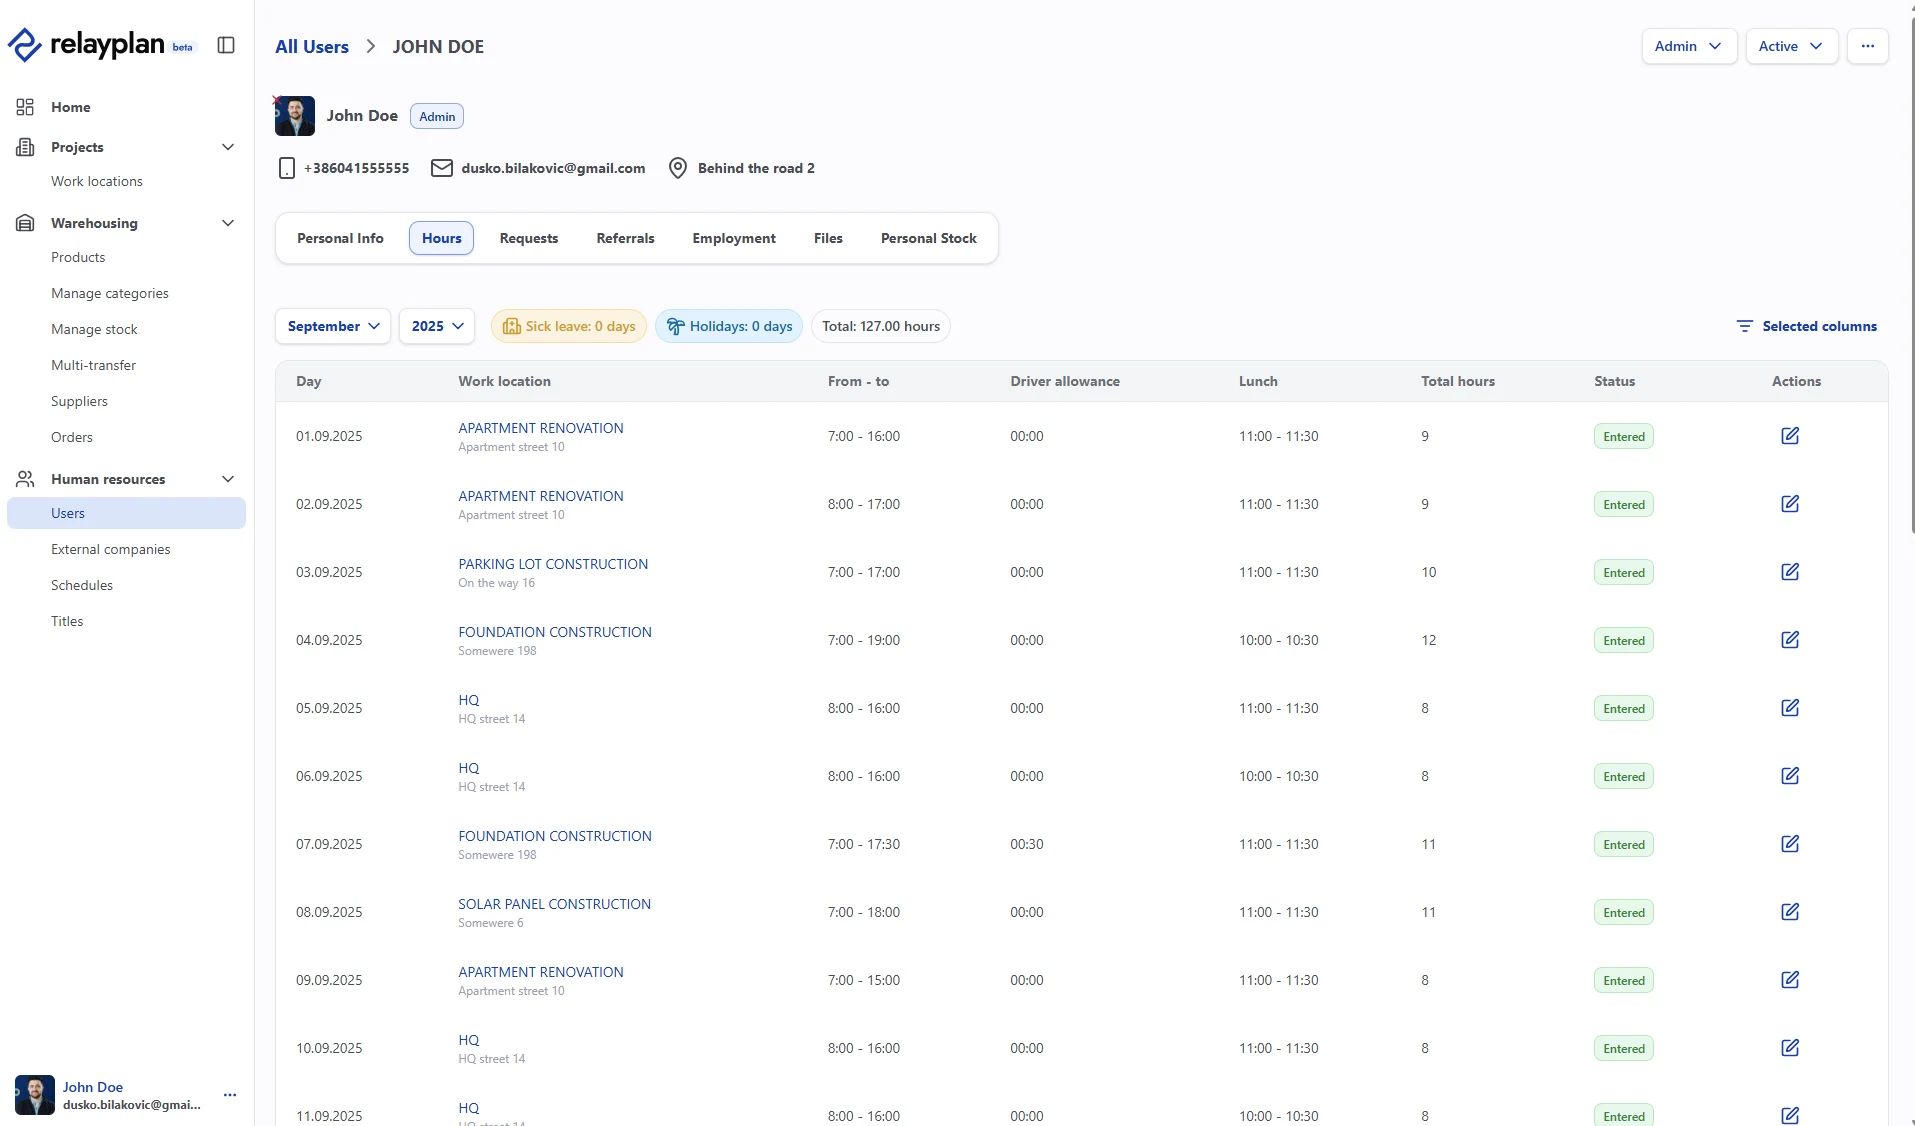
Hours — time tracking & review
Tracking employee hours can be simple, automated and paperless. The system records arrivals, departures, lunch breaks, sick leave and overtime. With the mobile app, employees clock in from remote locations, and project managers schedule work on the fly.
The result is accurate data for payroll calculations, audits and internal reporting — without collecting paper at the end of the month.
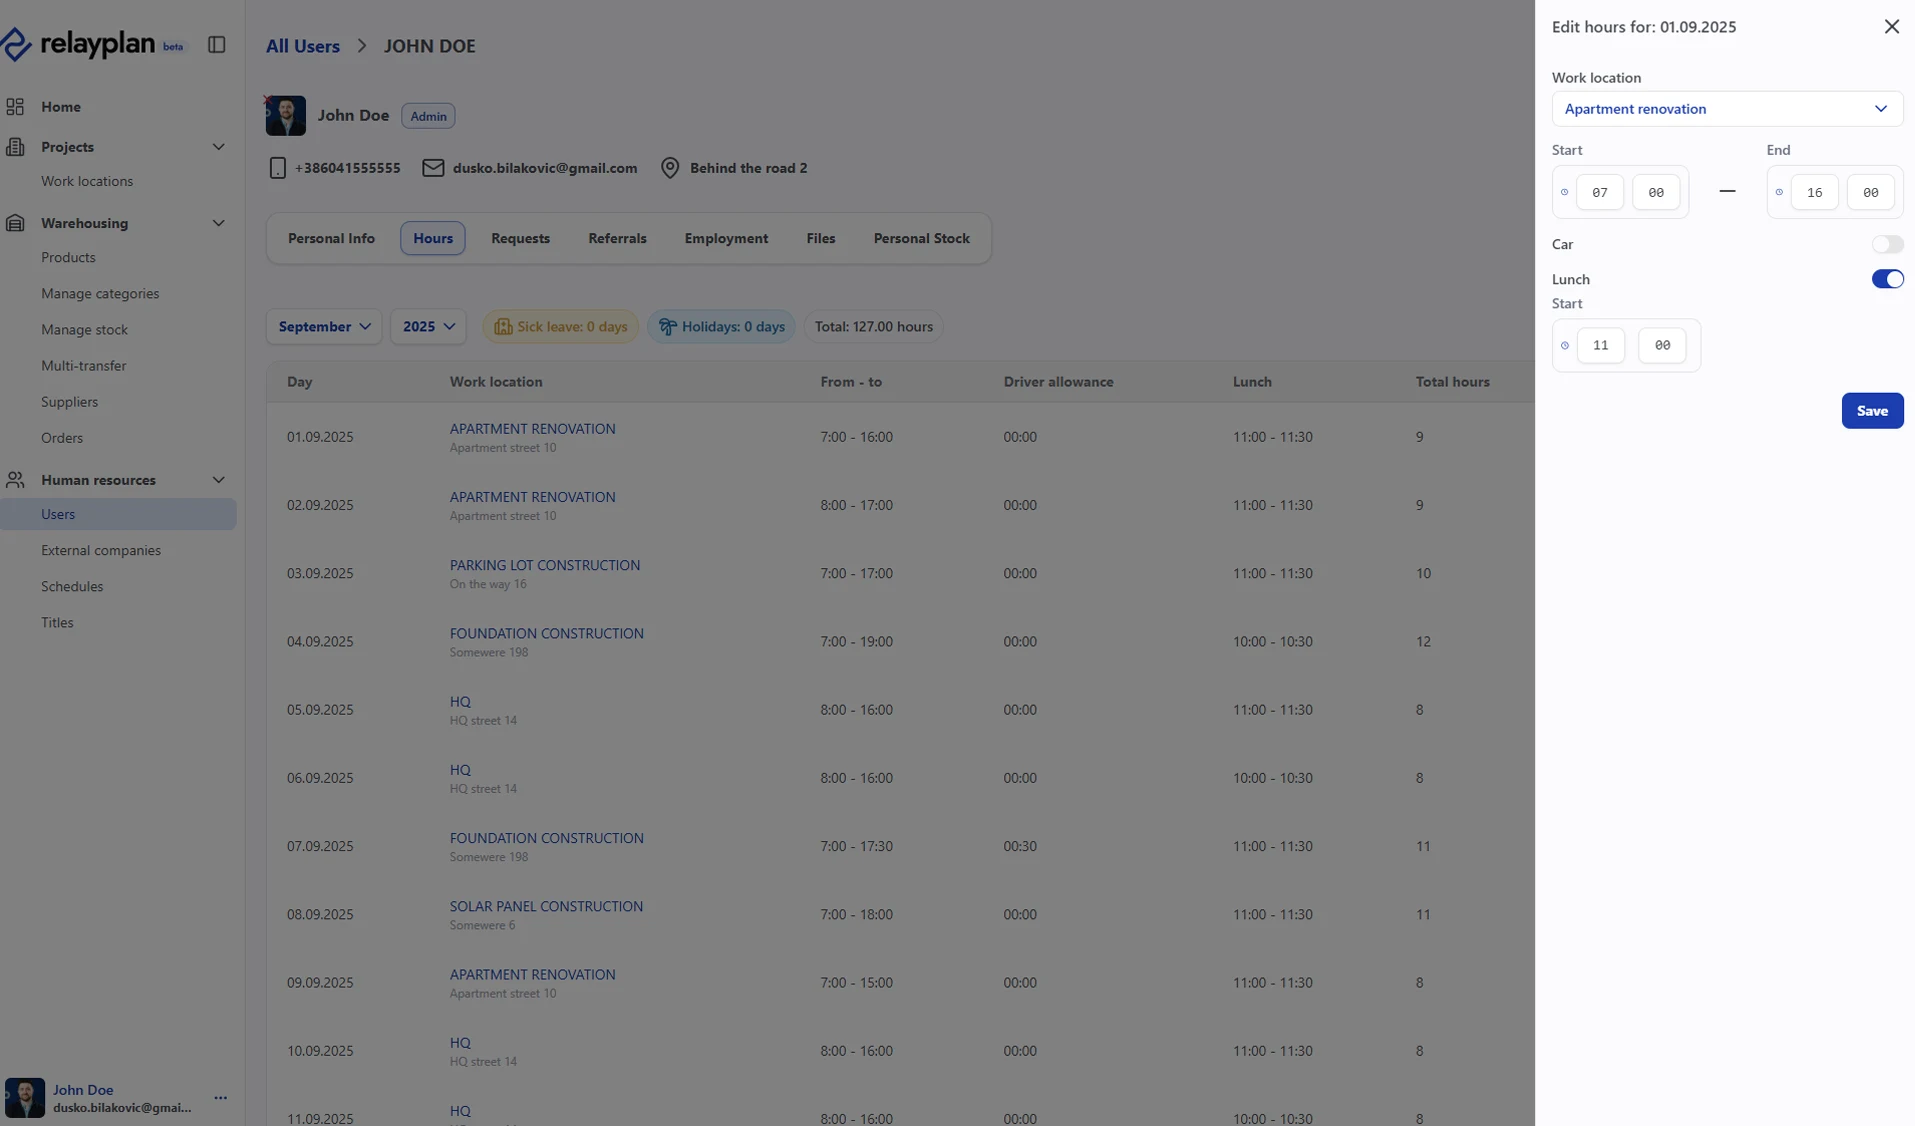
Entry methods
- Manual entry by an administrator or the HR-responsible person, via the web app — choosing the day, cost center and description.
- Mobile app — employees register their own hours from the field. See Mobile app.
Reviewing and approving hours
Warehouse
Efficient warehouse management is essential for every construction, installation or service company. The Warehouse module gives you a complete overview of all material movements — from the central warehouse through to personal stock and project locations.
Every item is traceable, which prevents losses, wrong transfers and misuse. Digital tracking also reduces paperwork and keeps the data available anywhere, including in the field.
Quick start
Types of stock movement
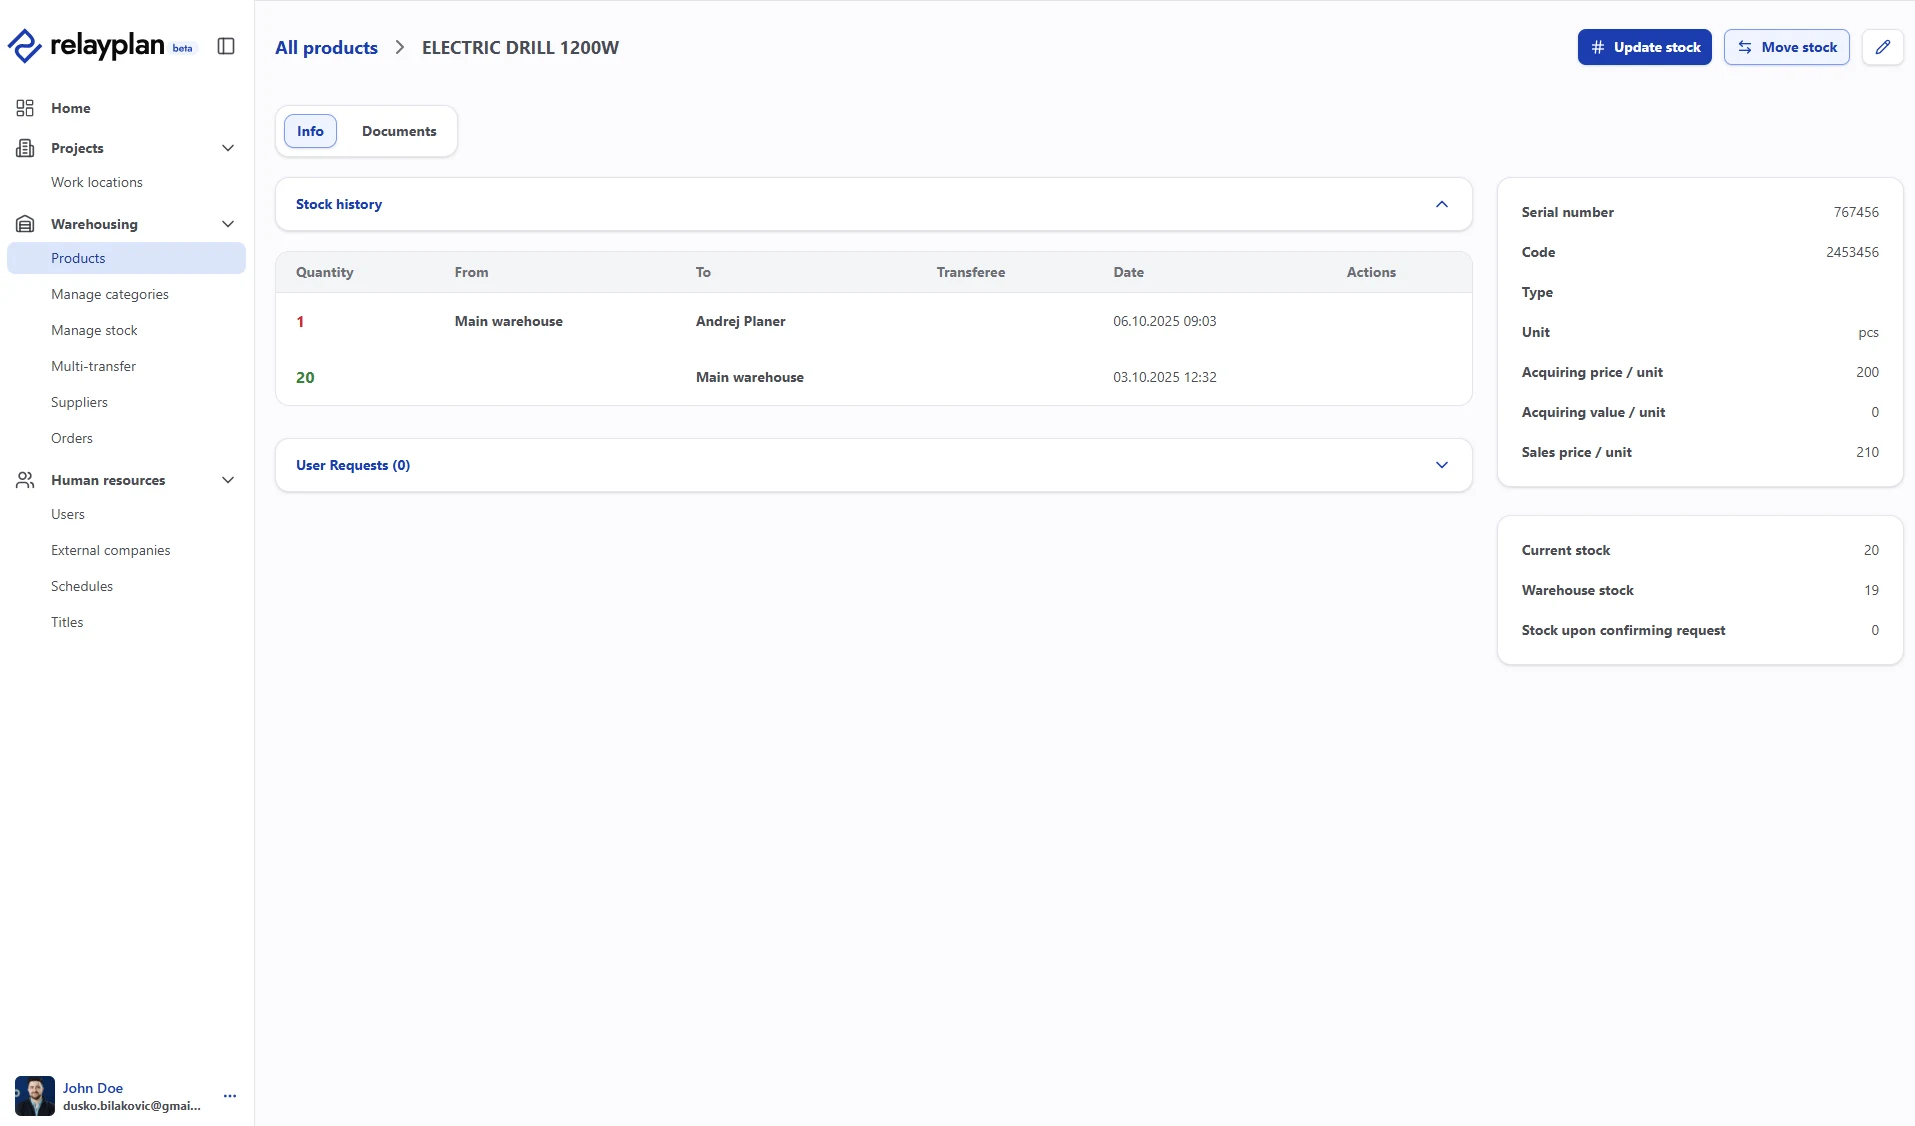
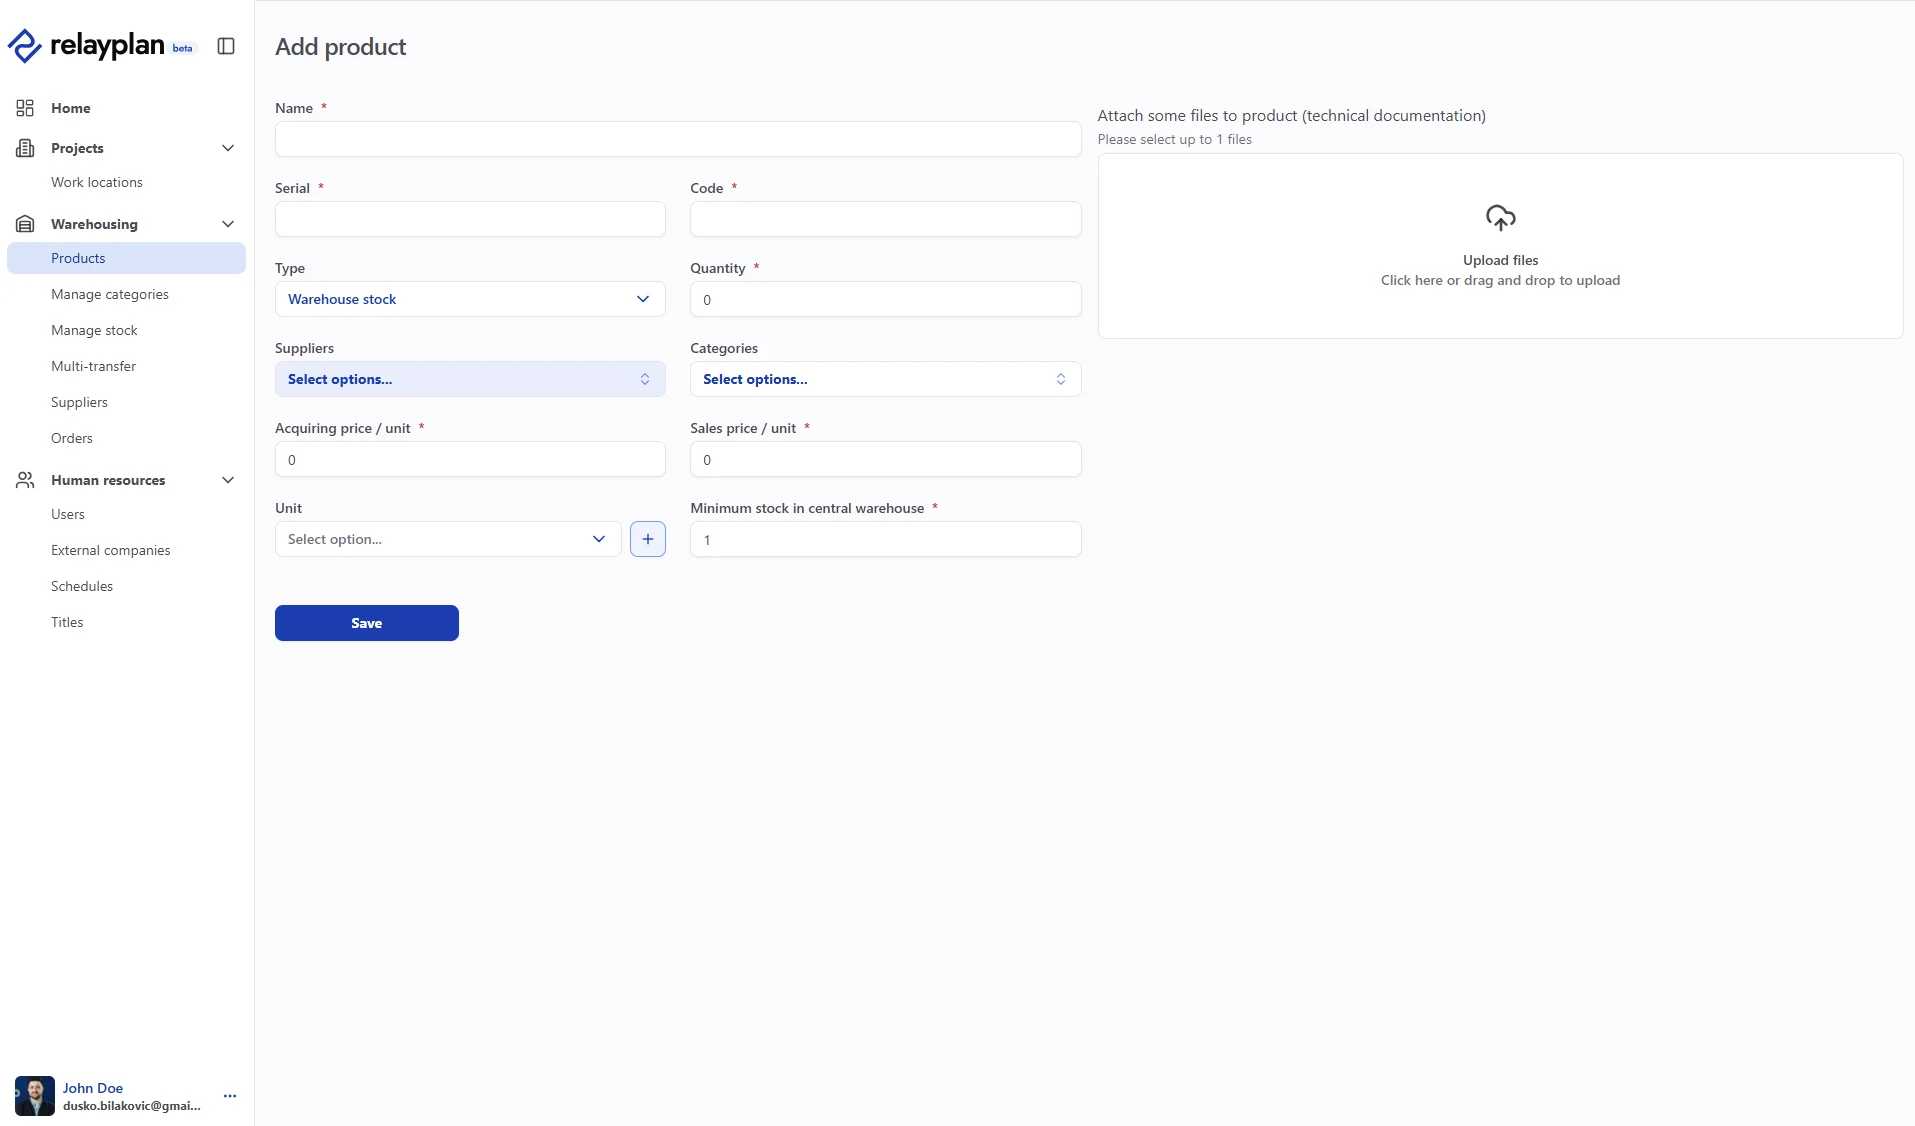
Stock, transfers & inventory
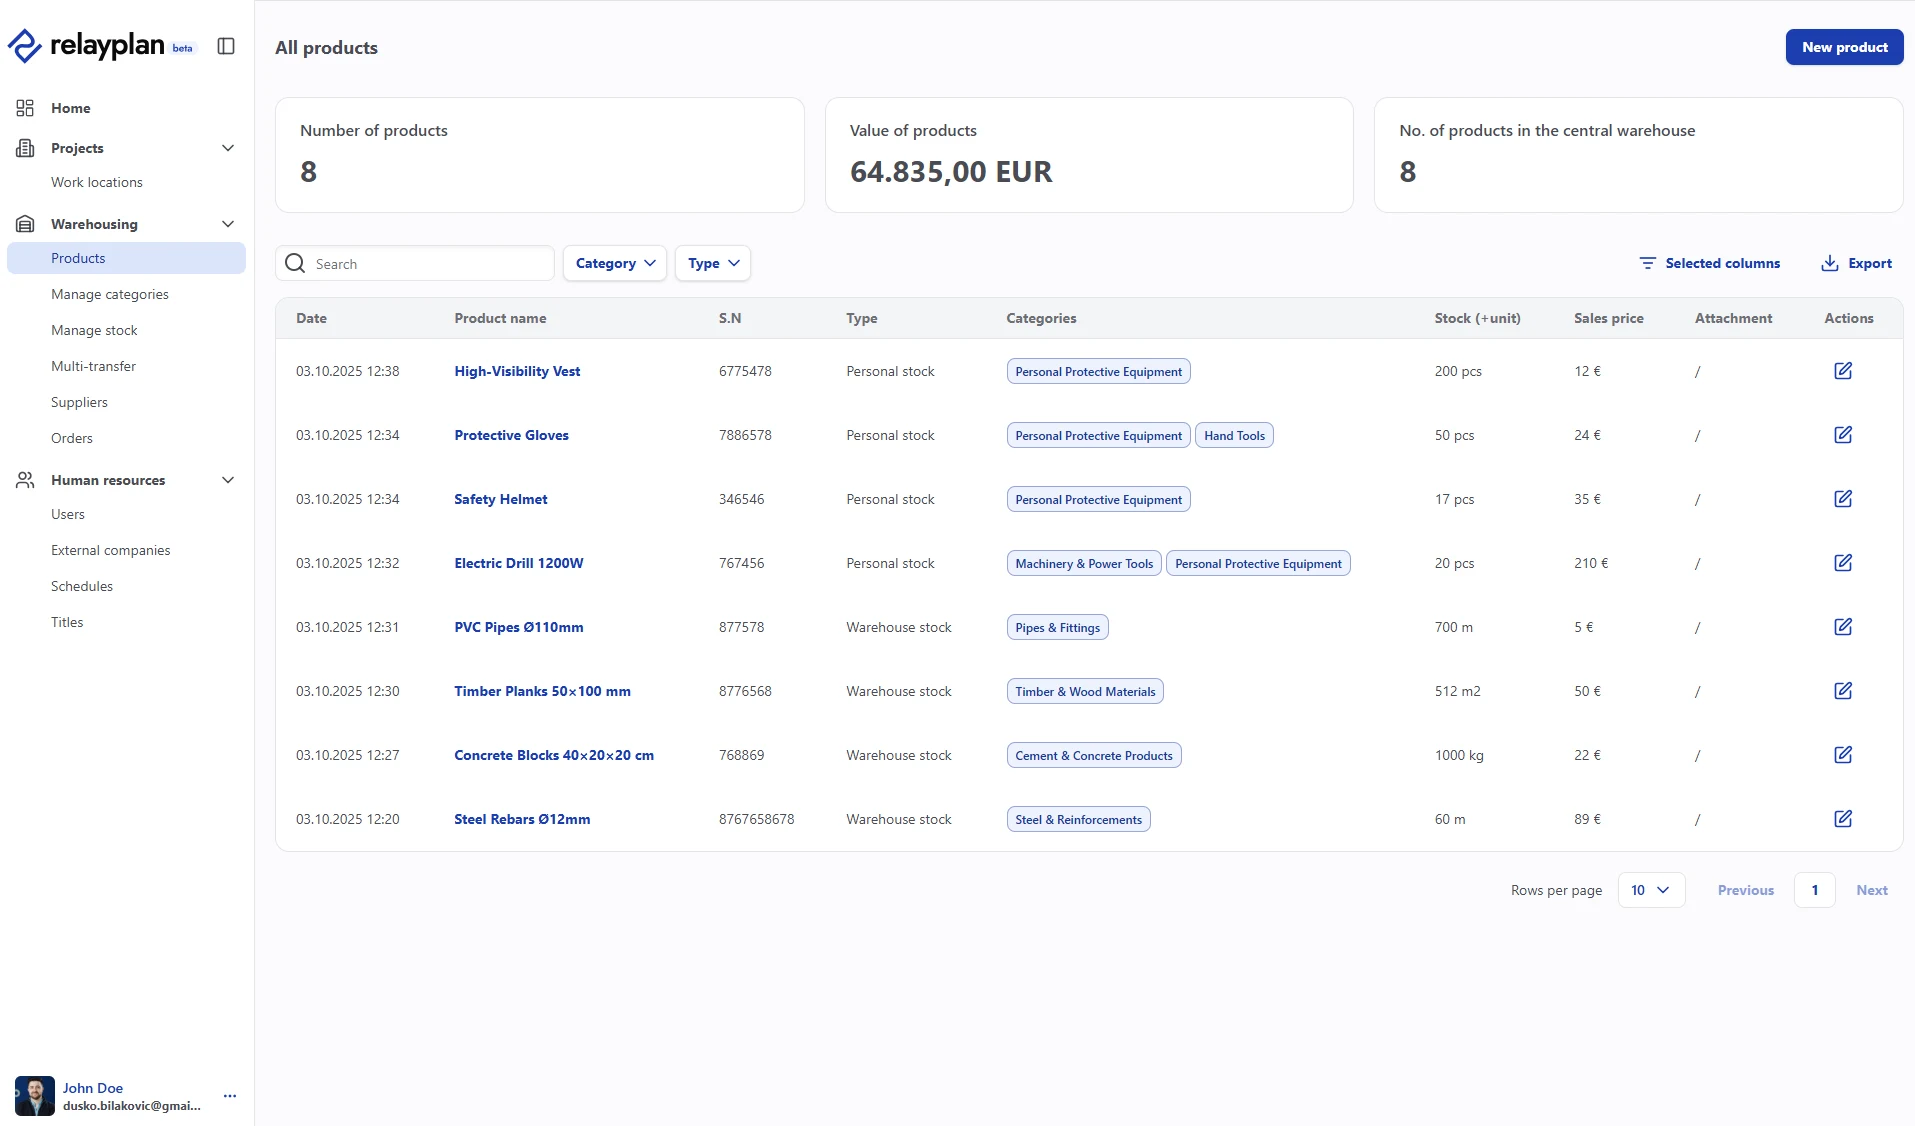
Accurate visibility of real stock is essential for smooth operations. The stock module supports precise lists across every location, including spare parts, small materials and tools, recording quantity, location, purchase and sale price, and serial numbers where needed.
Inventory support helps you detect discrepancies quickly and keep stock figures trustworthy.
What you can do
- Open stock lists for the main warehouse or for any individual personal stock.
- Review items that have fallen below their minimum stock level.
- Print or export lists for counting or for accounting.
- During inventory, enter new quantities manually or import them from a spreadsheet.
- View an item's movement history, or filter by the projects where it was used.
- Manage personal stock, which employees can see in the mobile app.
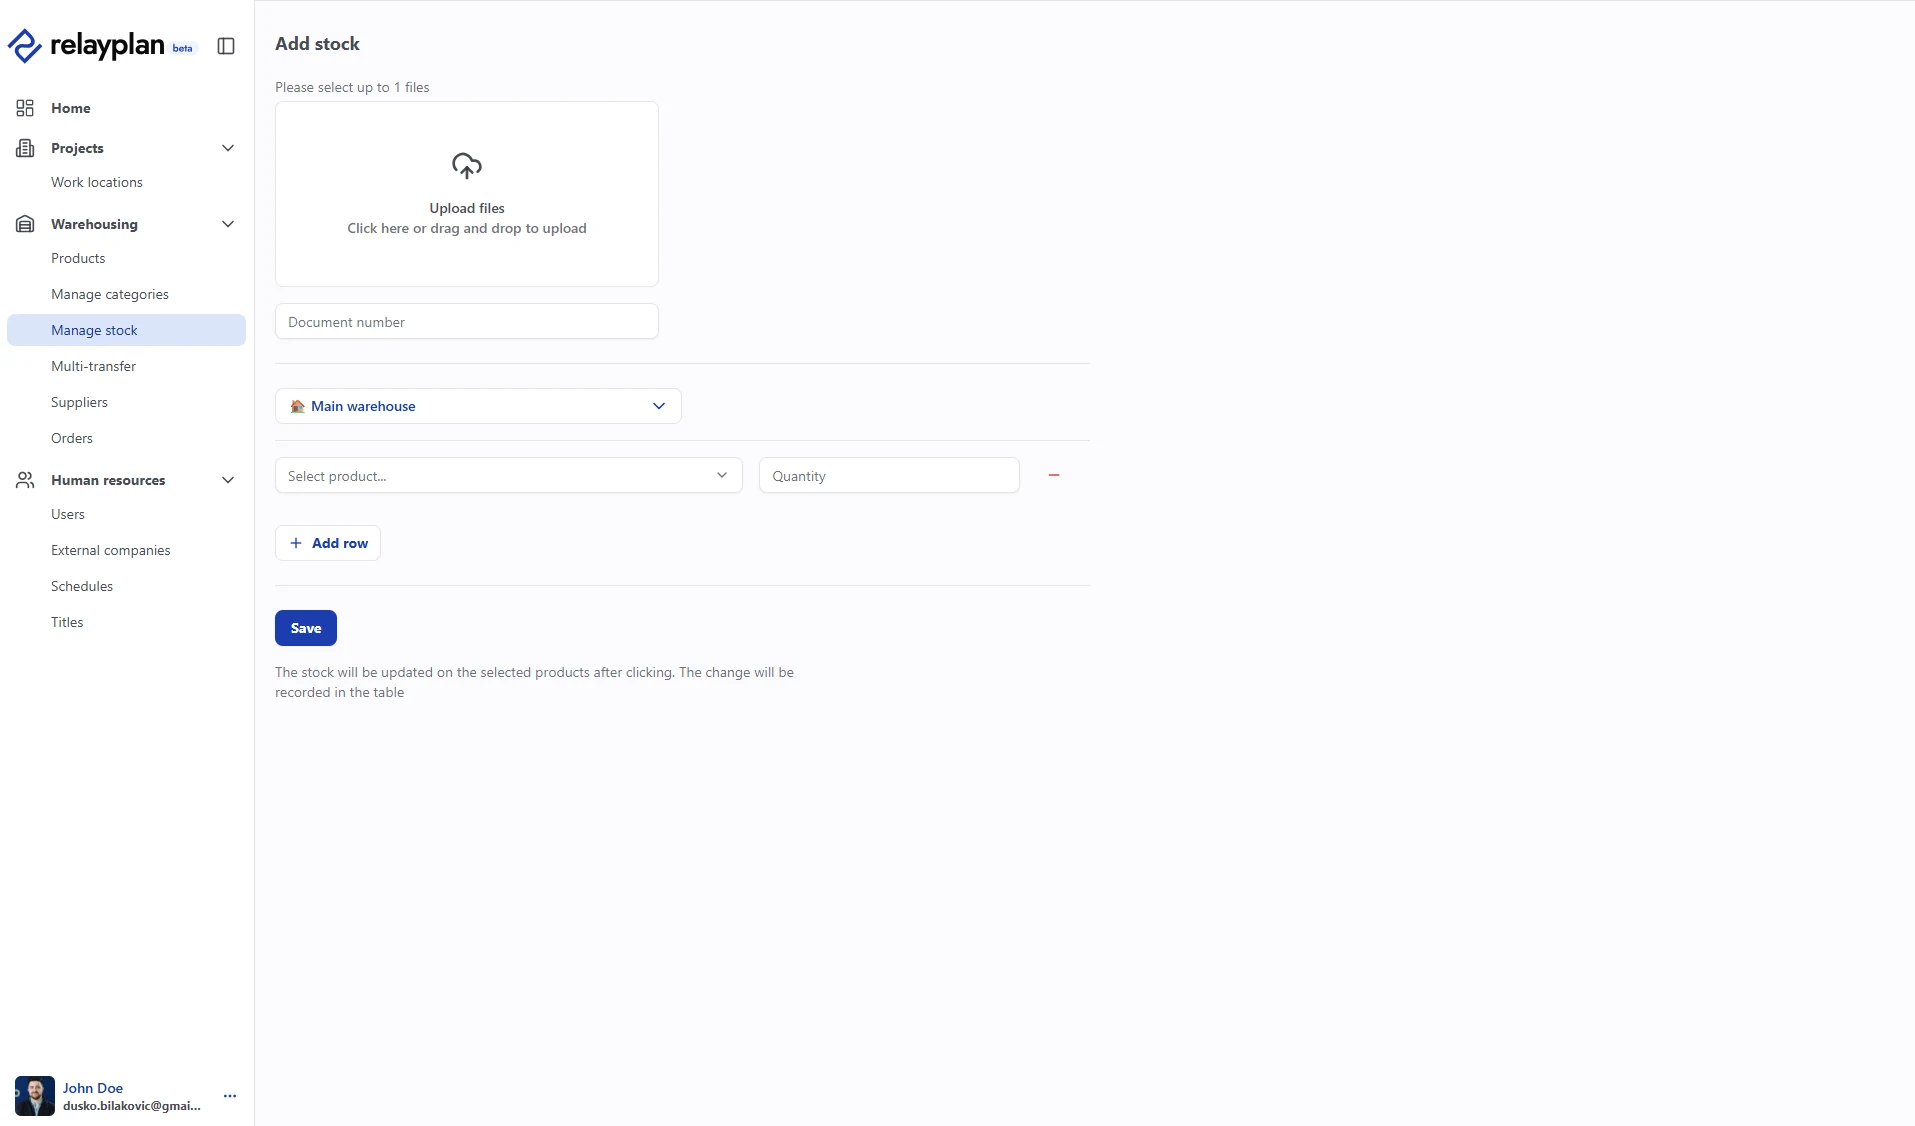
Add stock
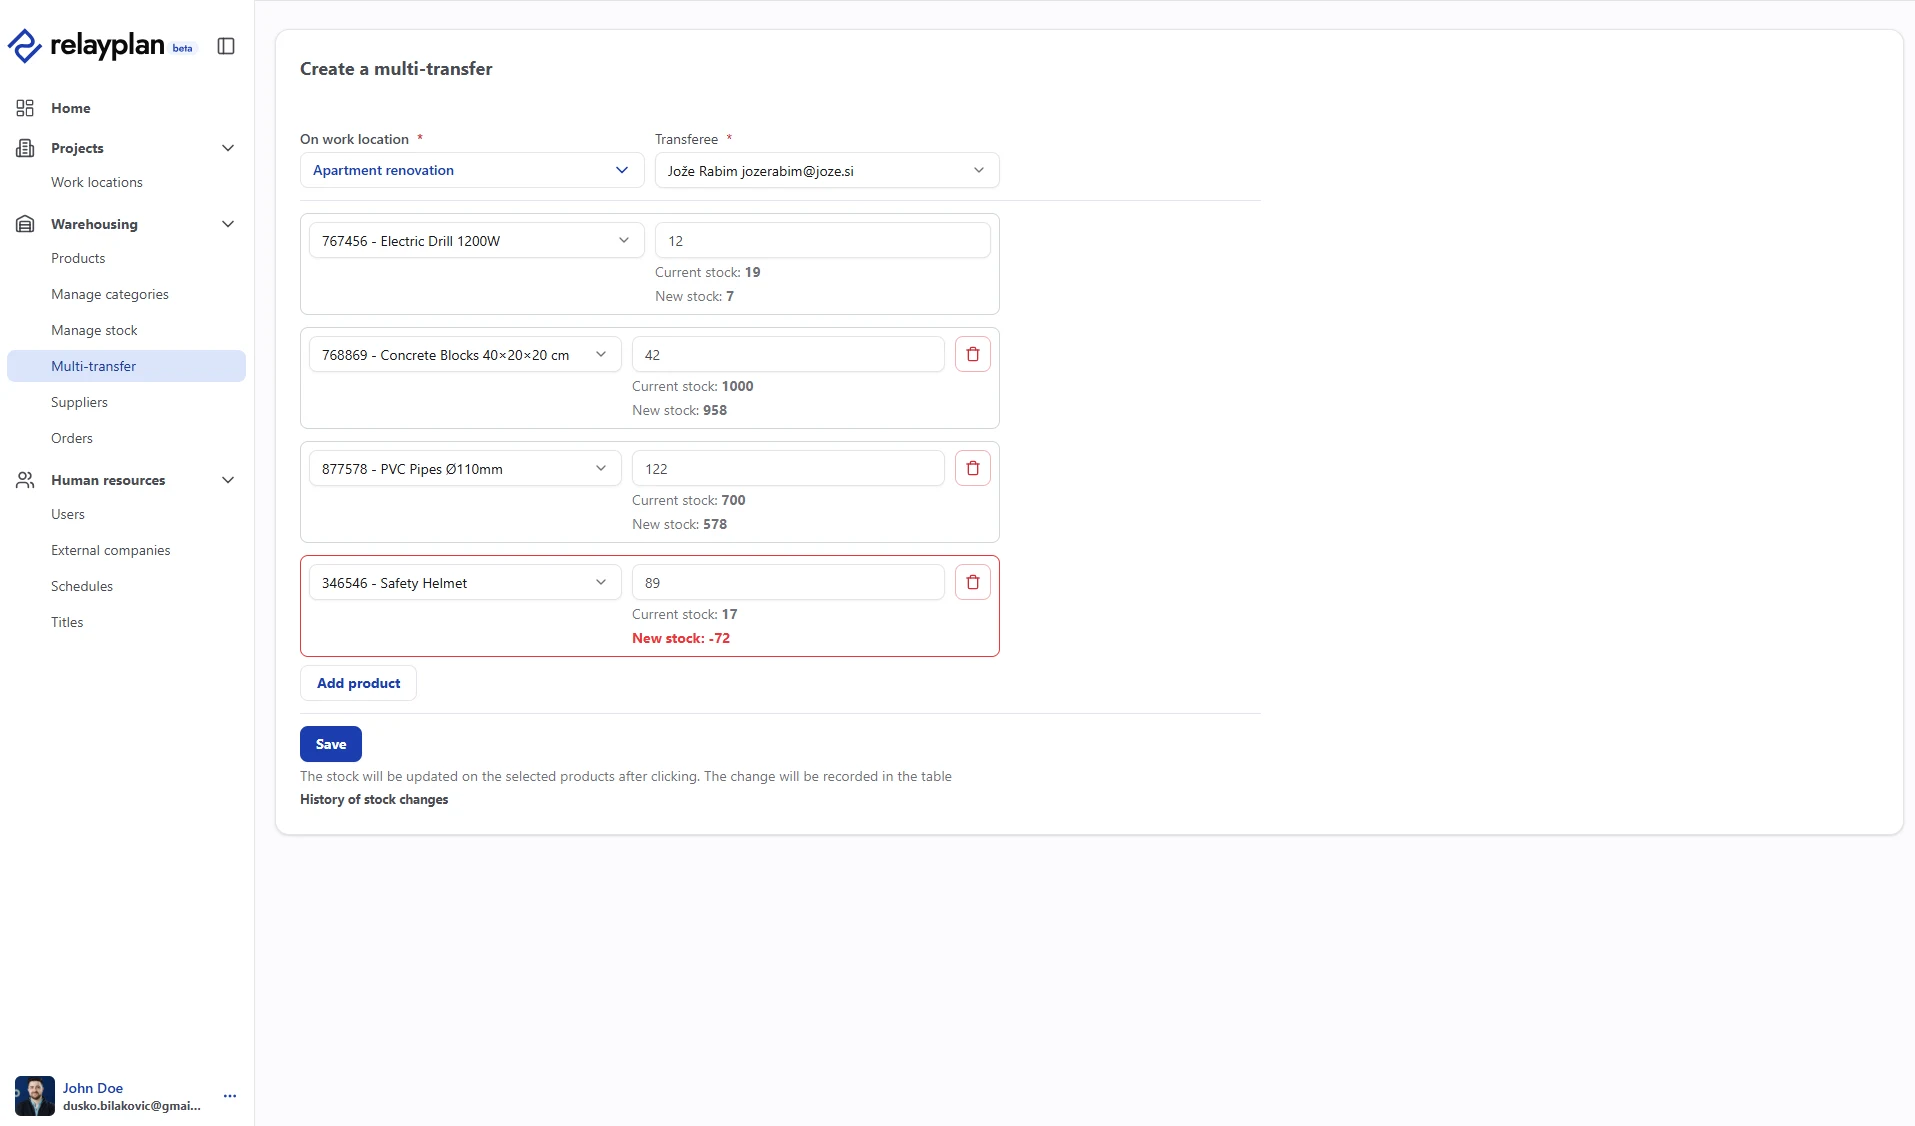
Move several items with Multi-transfer
Orders
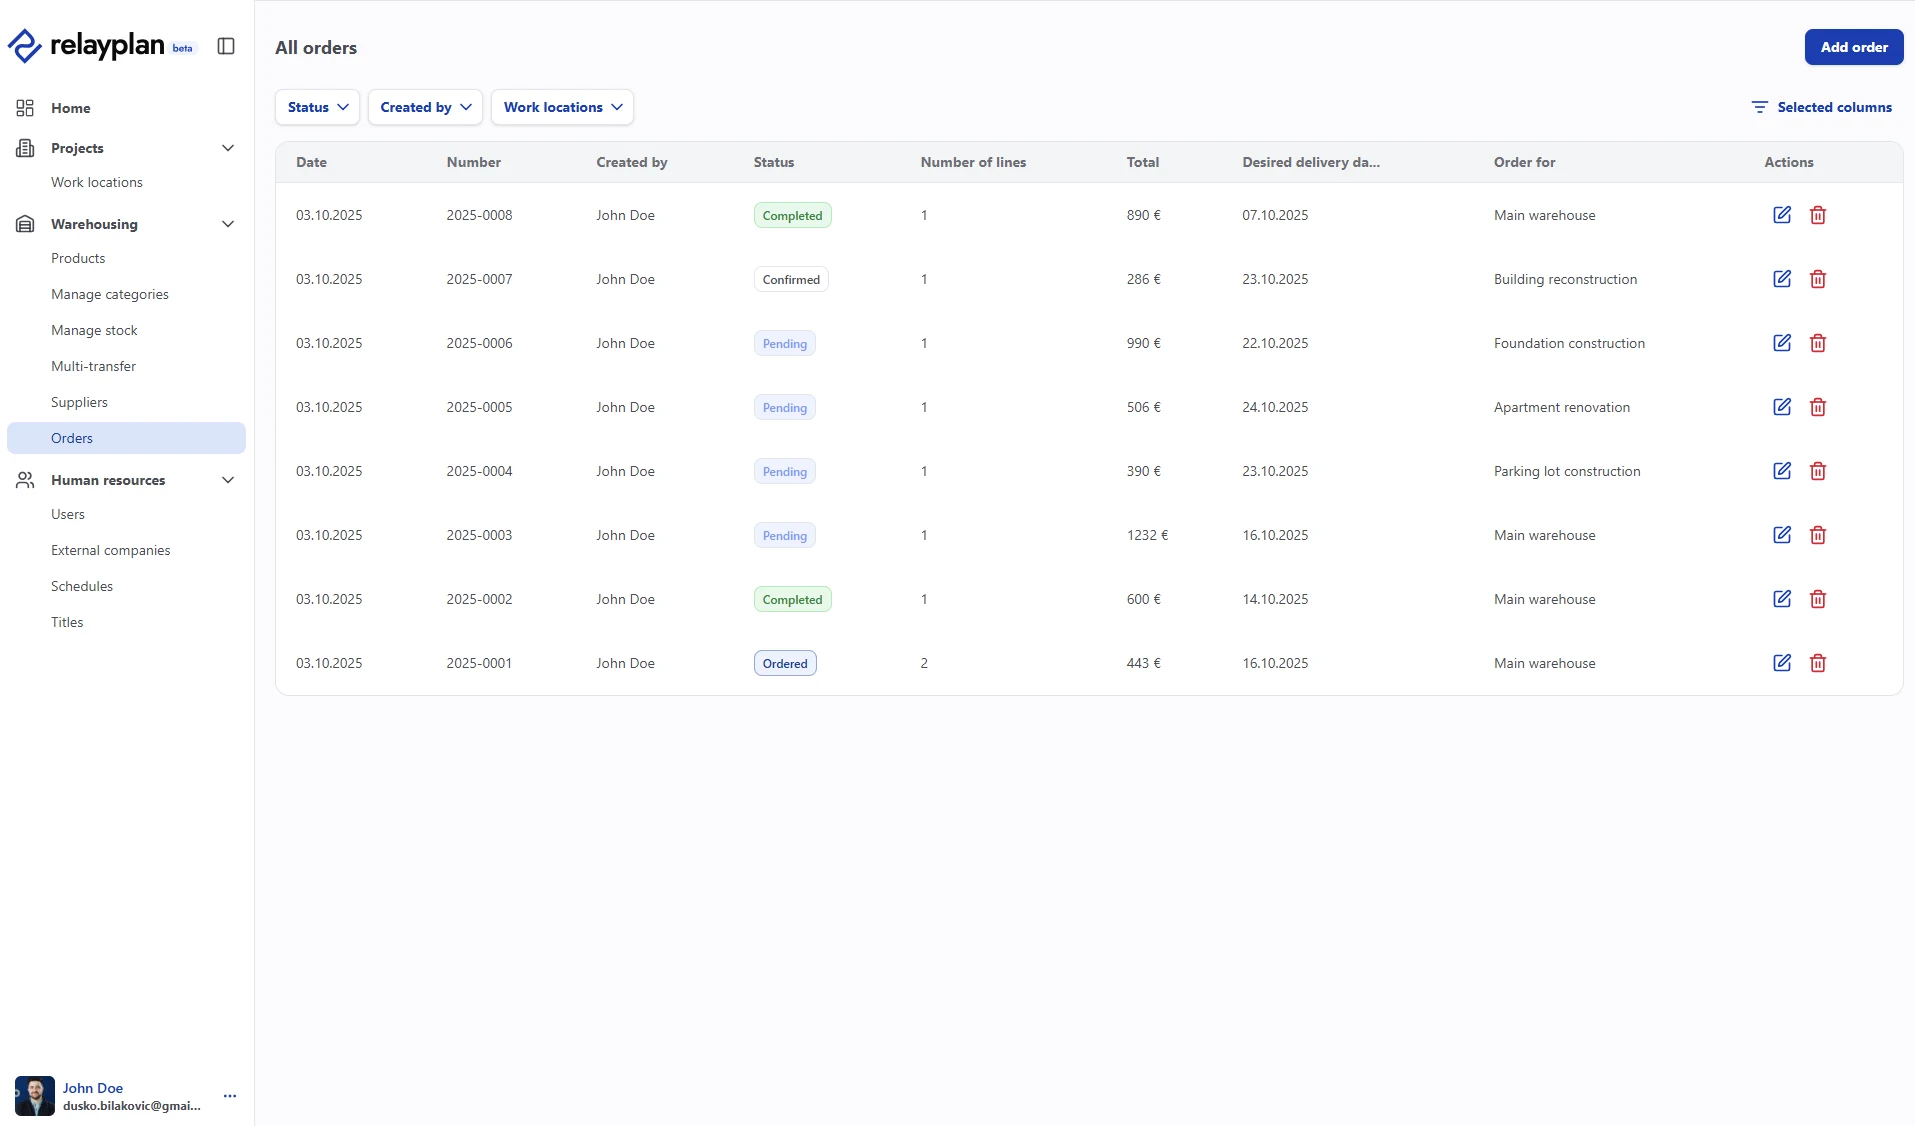
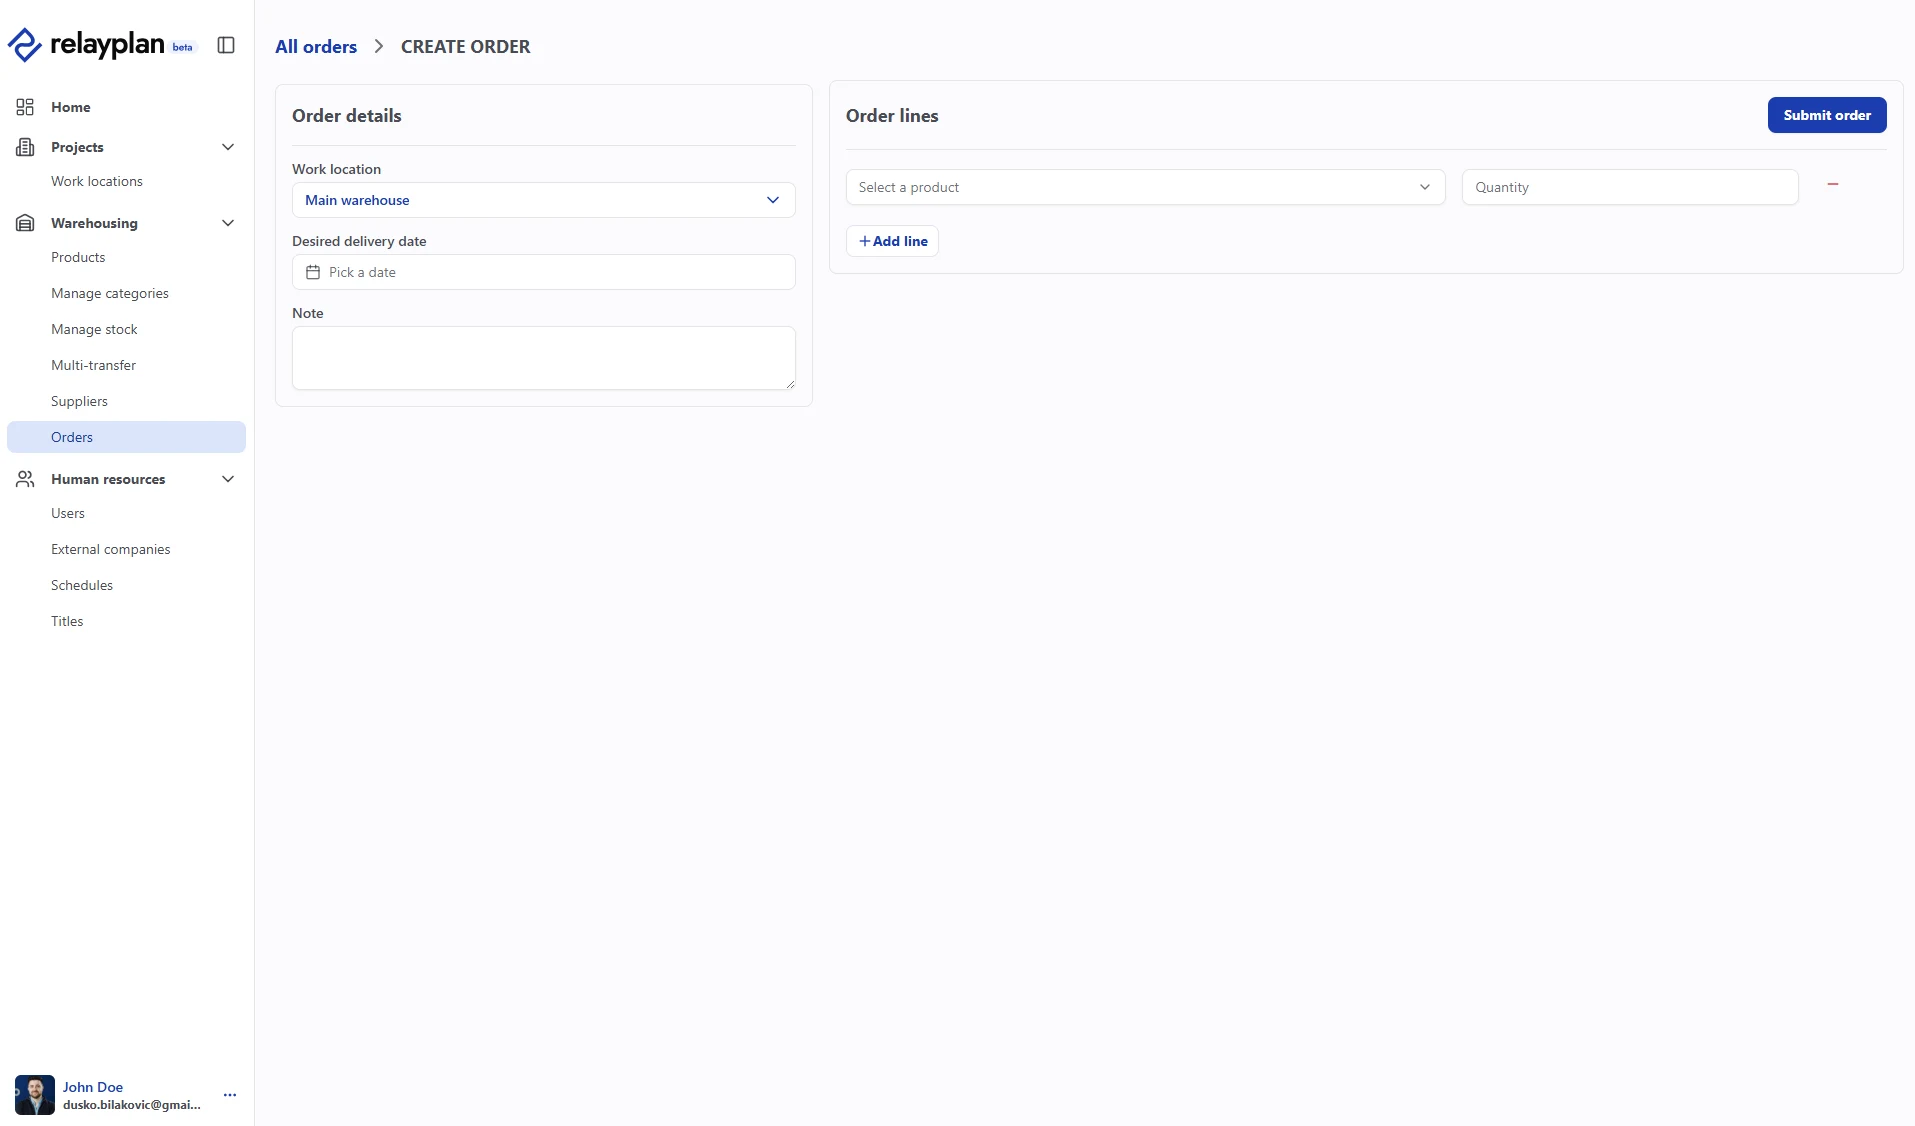
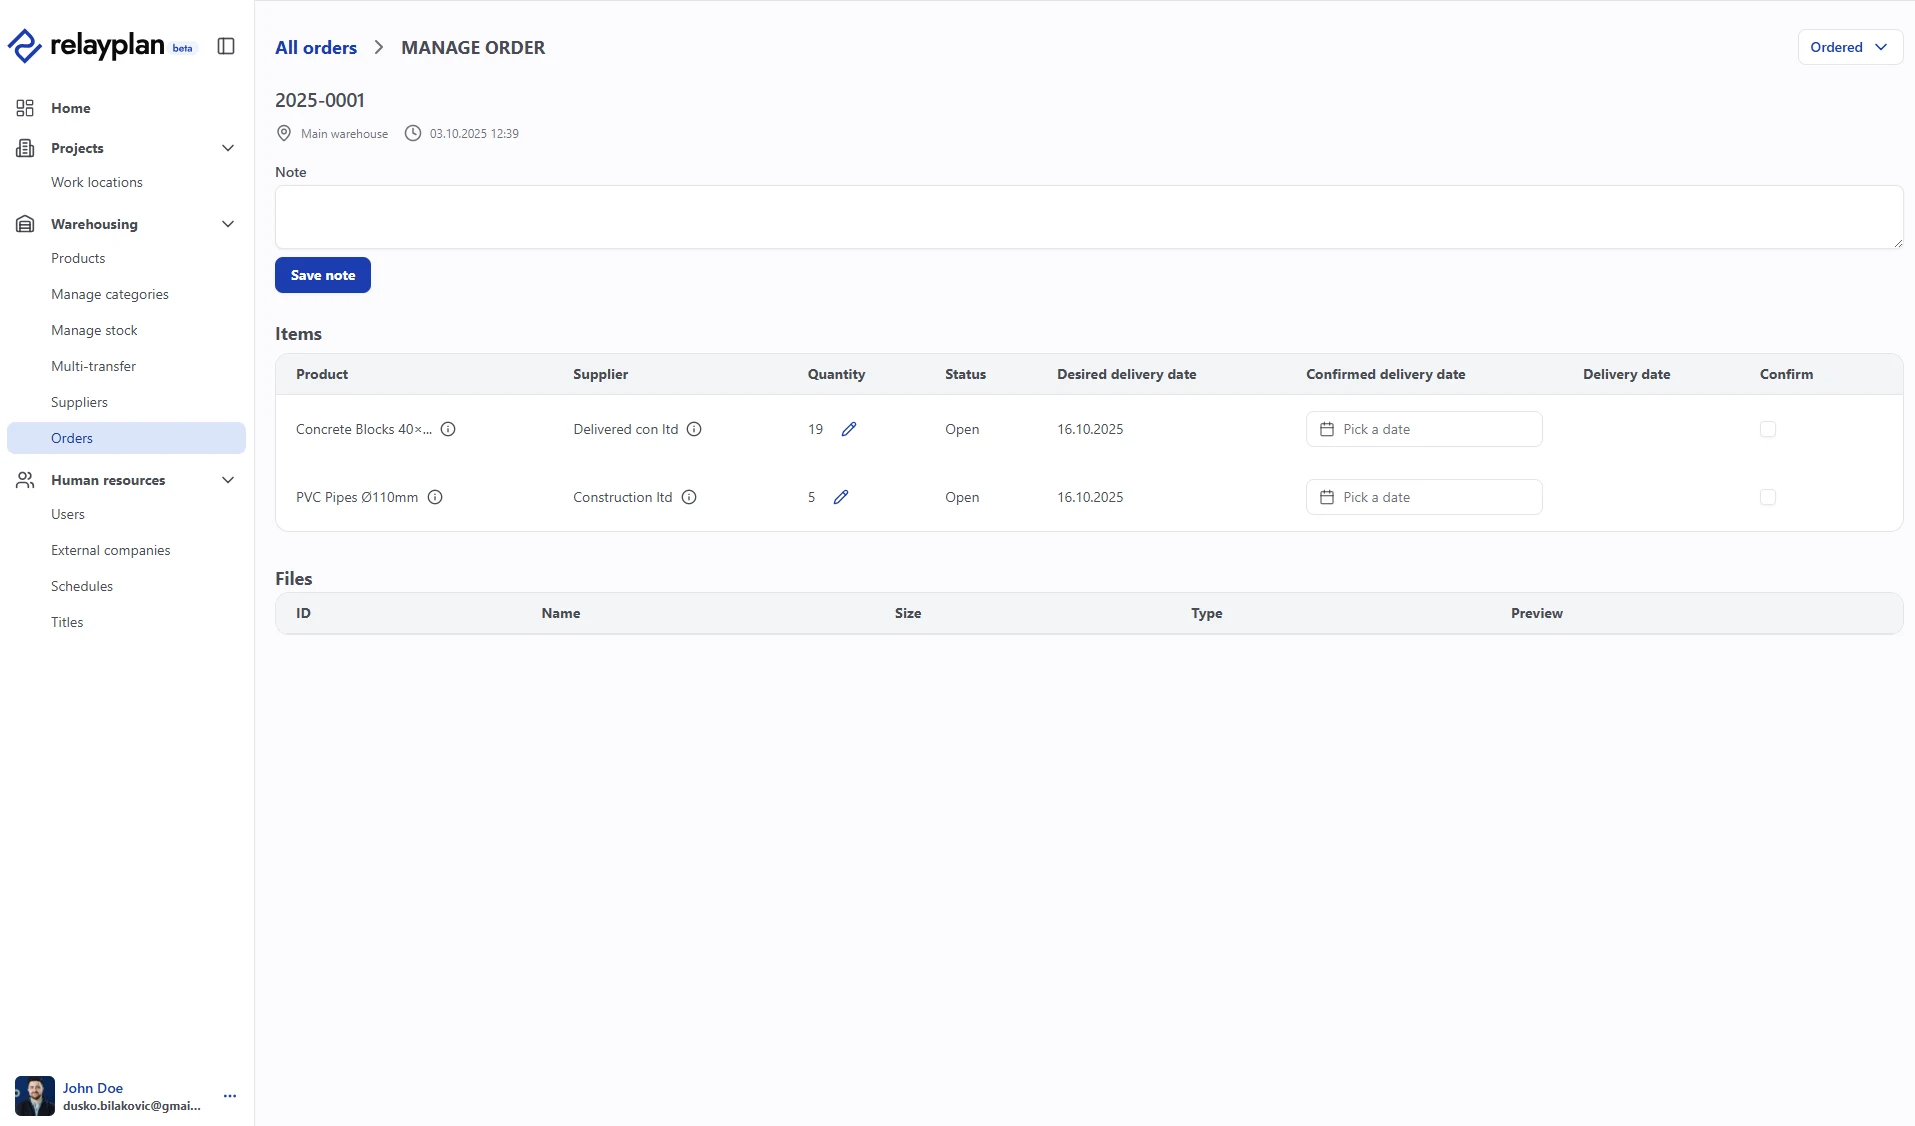
The Orders module leads the entire purchasing process — from an identified need, through preparing and approving a purchase order, to receipt and posting stock into the warehouse.
Because orders are linked to stock levels, the system can suggest an order when it detects a shortage, helping you avoid both project delays and duplicate purchases. The whole process is digital and auditable, with export options for accounting or suppliers.
Workflow
The source of truth is the status shown in the orders list. Changing the status inside an individual order is not immediately reflected in that order's own data.
Quotes and invoices
The Quotes and invoices module covers the selling side of the job — from the quote through to the invoice you send. Because every invoice is tied to a cost centre, a project's income and its costs finally meet in the same place.
In the left-hand menu, Quotes and invoices groups Quotes, Issued invoices, Clients and suppliers, Services and Work types.
The issued invoice list
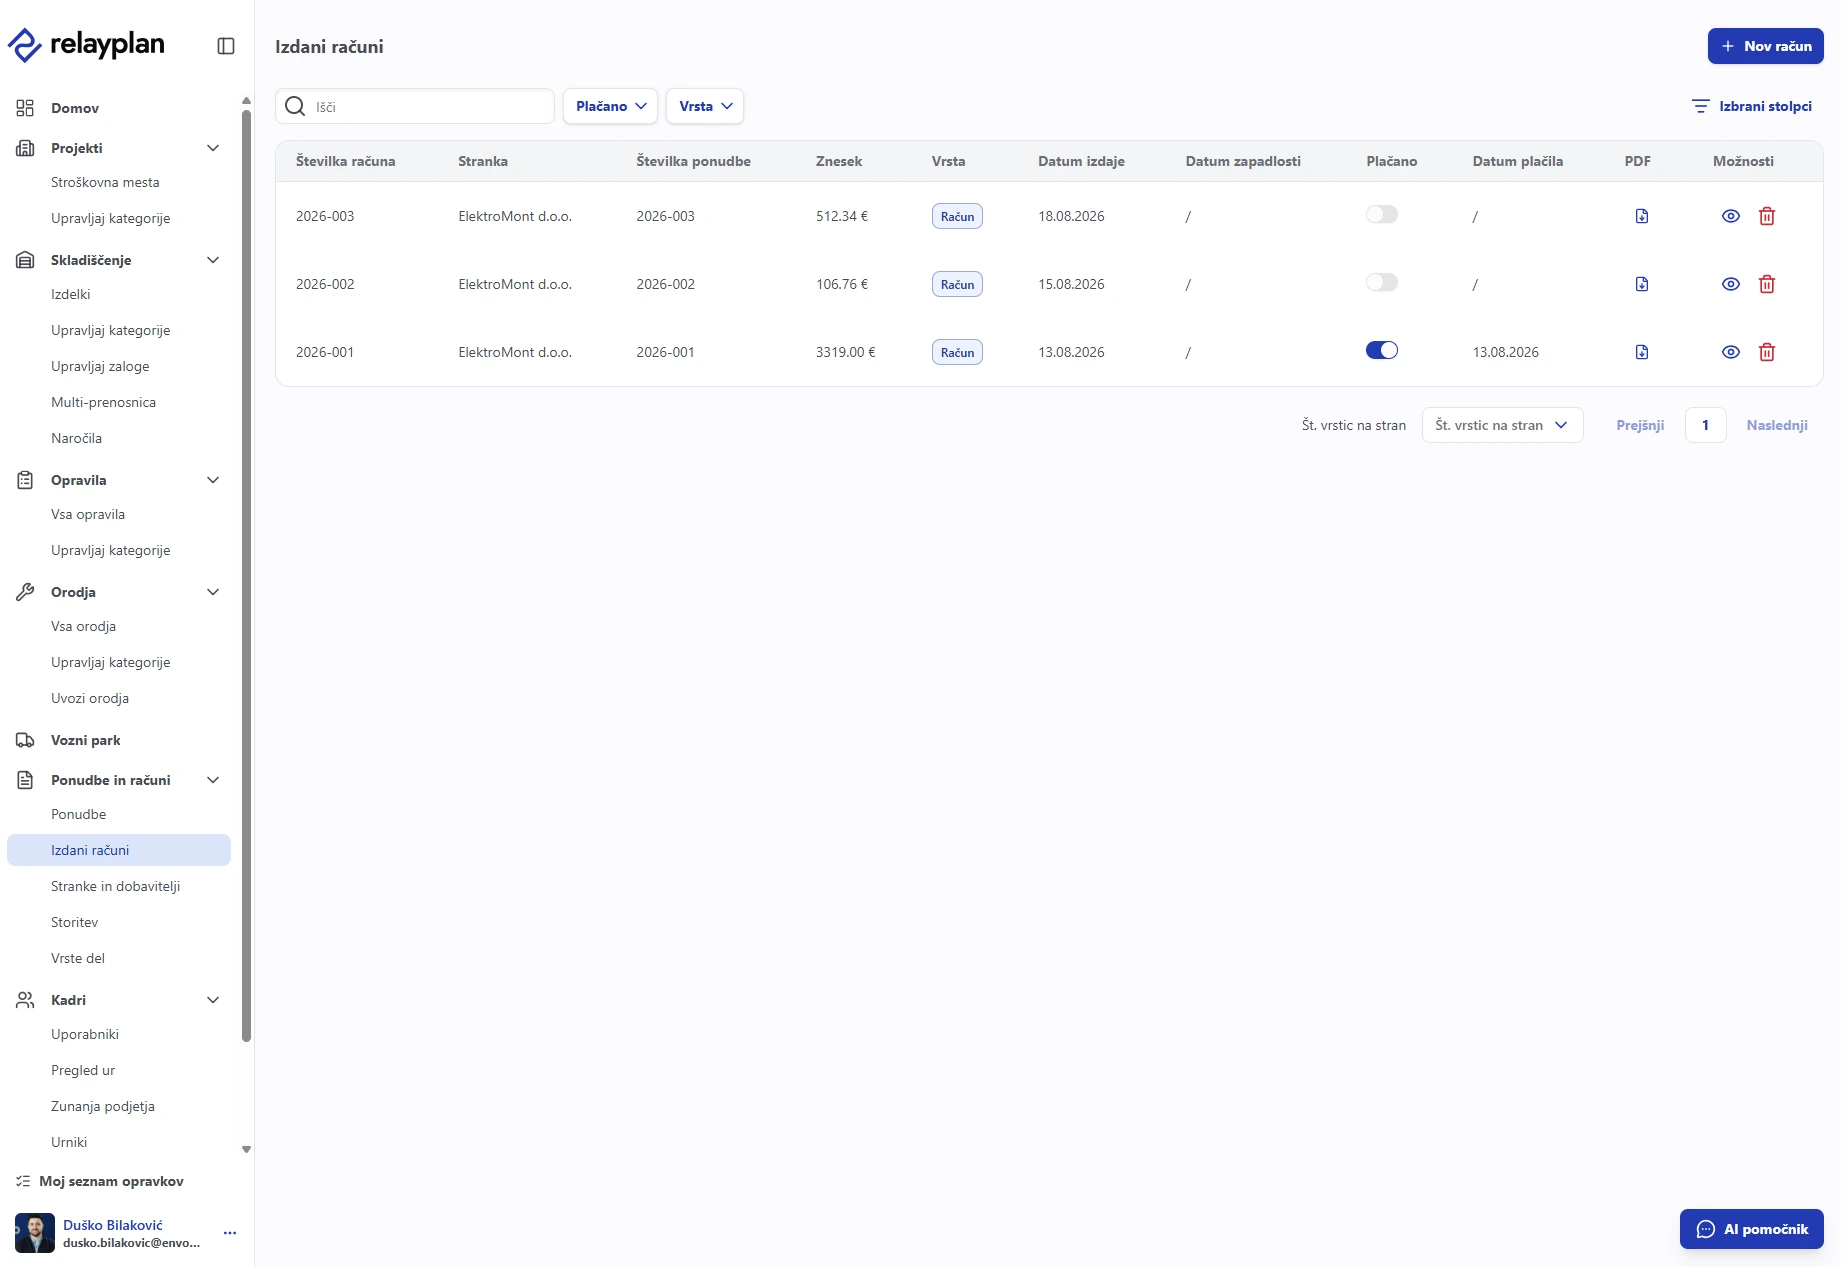
The list shows the invoice number, the client, the quote it came from, the amount, the document type, the issue and due dates, and whether it has been paid.
The Paid column is a switch: mark an invoice paid straight from the list and the payment date is recorded for you. The icon in the PDF column downloads the document.
Above the list sit a search box and the Paid and Type filters. Selected columns controls which columns are visible.
Creating an invoice
An invoice can be raised from an accepted quote. The quote is then shown on it as the Source quote, and there is no need to enter the line items again.
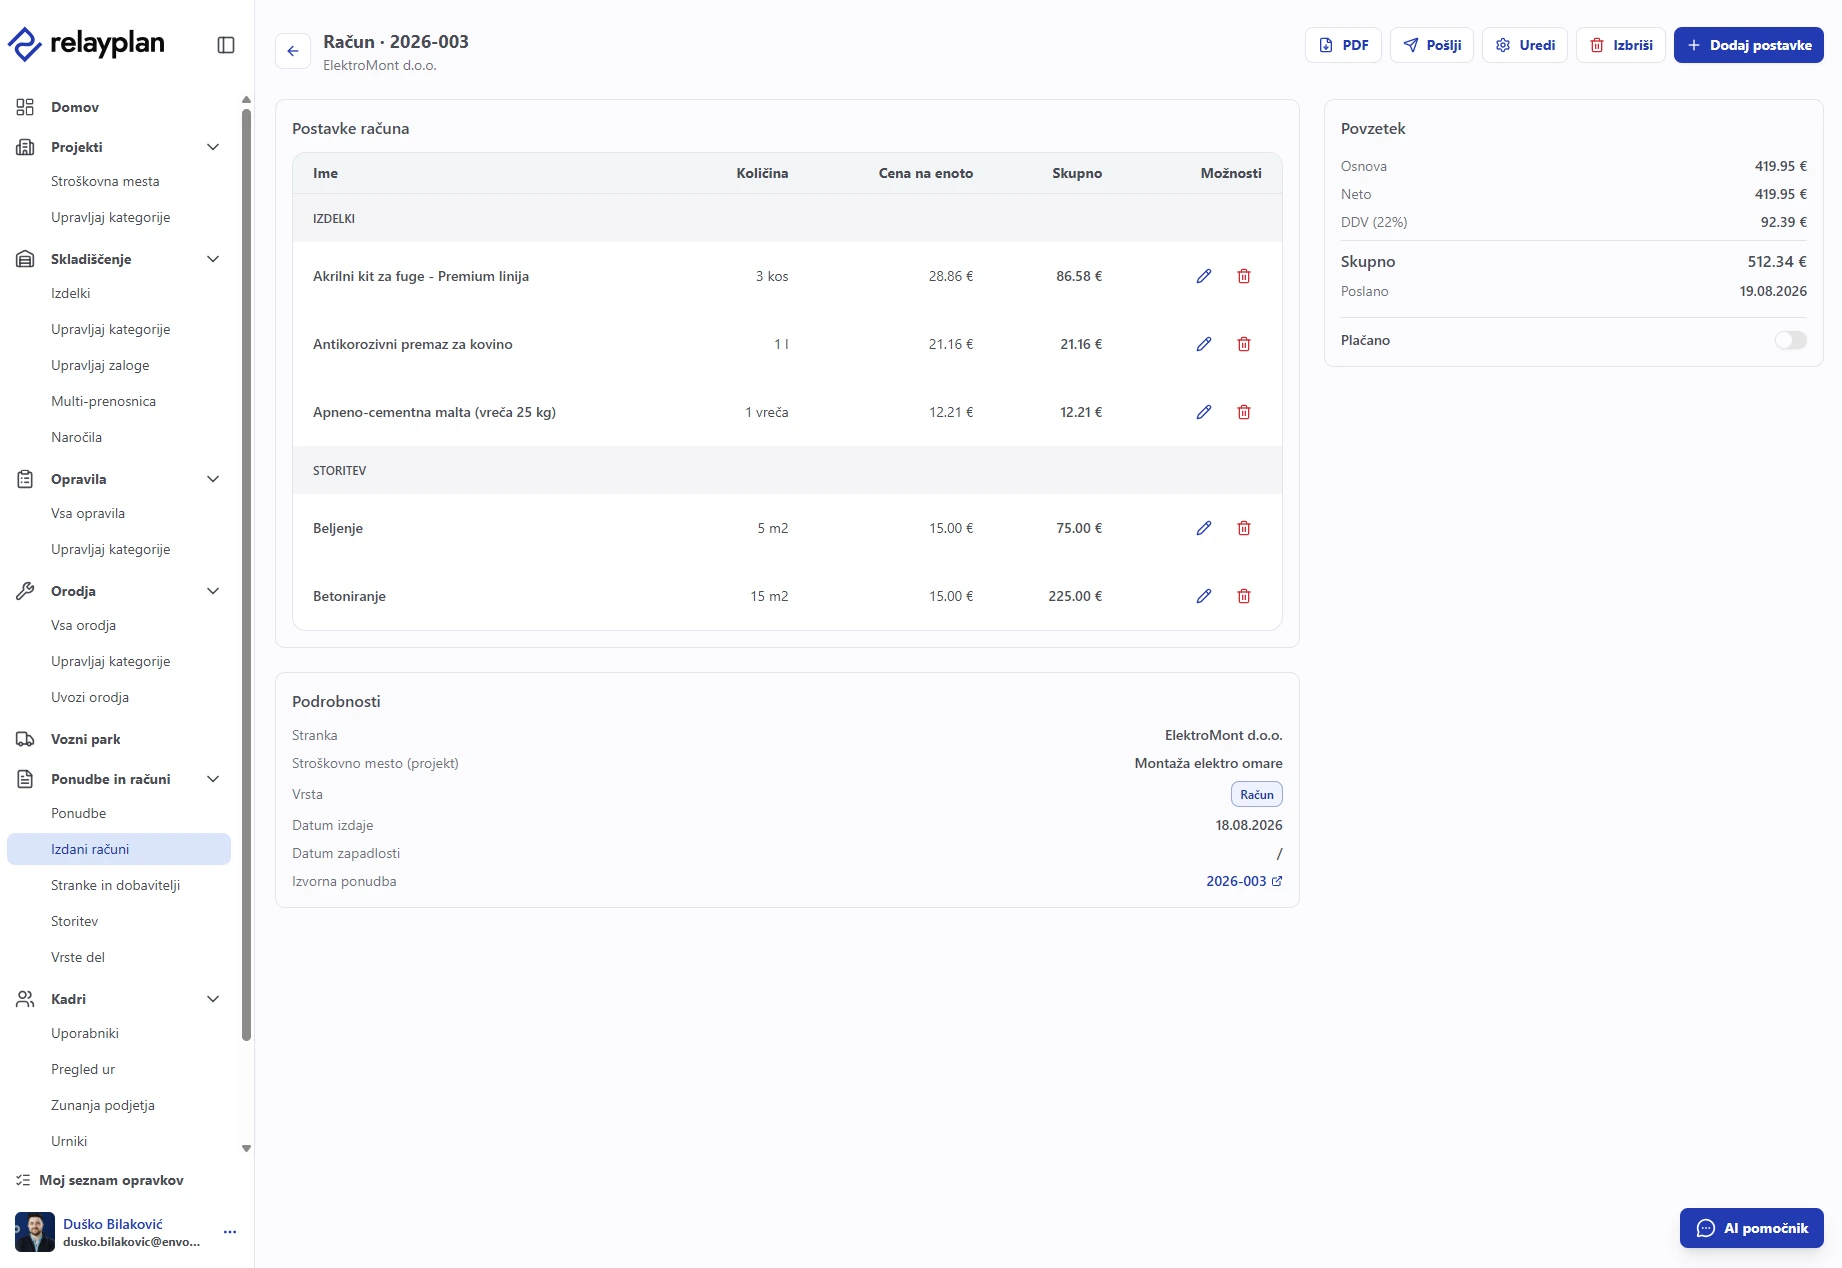
Line items and totals
Line items are split into Products and Services, so it is clear at a glance how much of the invoice is material and how much is labour. Any line can be edited or removed.
The summary on the right adds the net and VAT up to the total, and shows when the invoice was sent. The Paid switch is the same one as in the list.
The details underneath tie the invoice to its customer, cost centre, document type, and issue and due dates.
Sending an invoice
Line items, dates and amounts are edited on the document itself, not in the send window. There you only change the covering message and the text printed on the document.
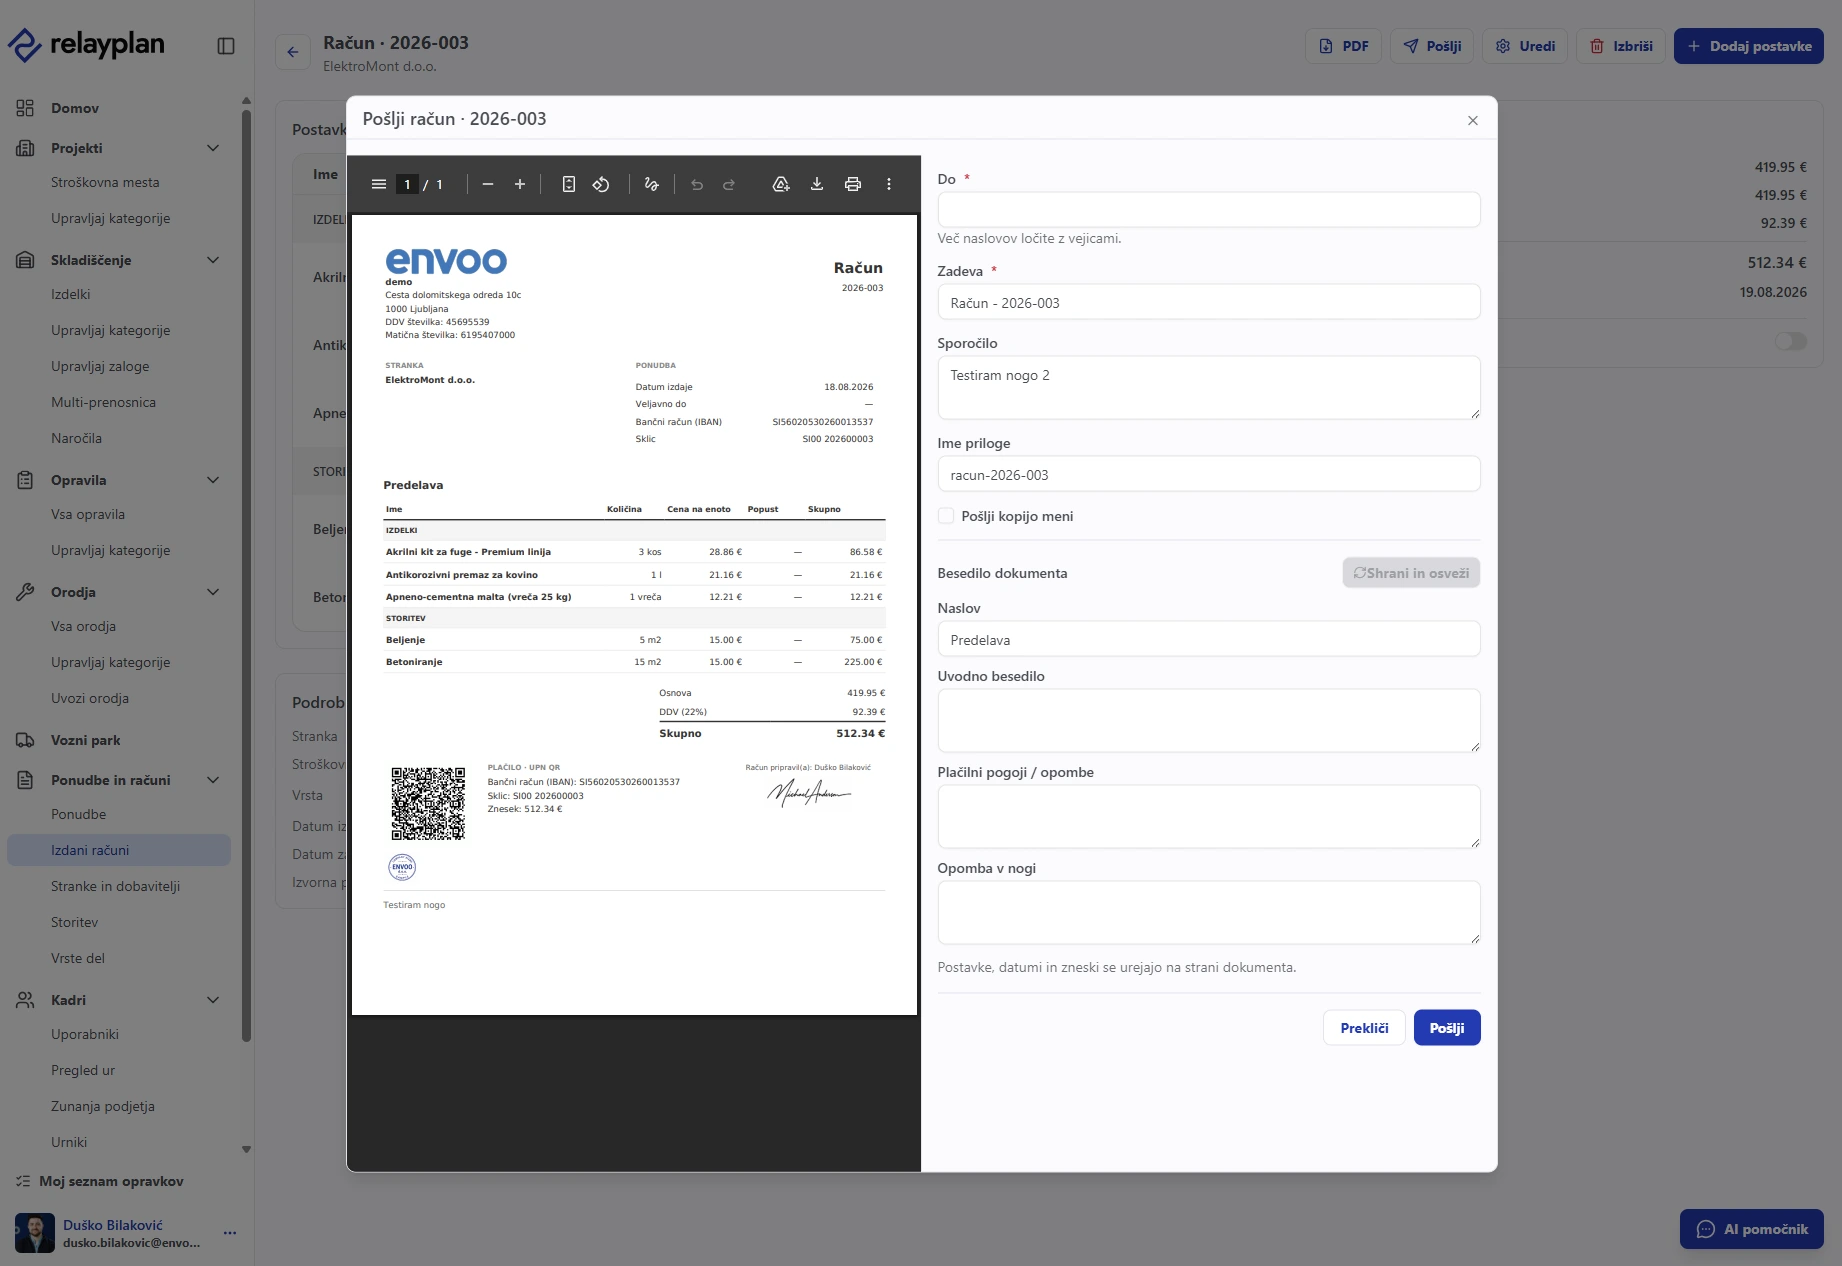
The document carries a UPN QR code with the IBAN, reference and amount, so the customer can pay it with a single scan.
Employees & assignments
Field operations need precise, clear management of assignments — whether that is a work order or the temporary placement of a worker at another location. The assignments module makes planning and tracking every type of assignment straightforward.
Assignments are linked to employees, projects, locations, hours and resources. Built-in digital messaging replaces paper and phone calls, which increases both traceability and reliability.
Add an employee
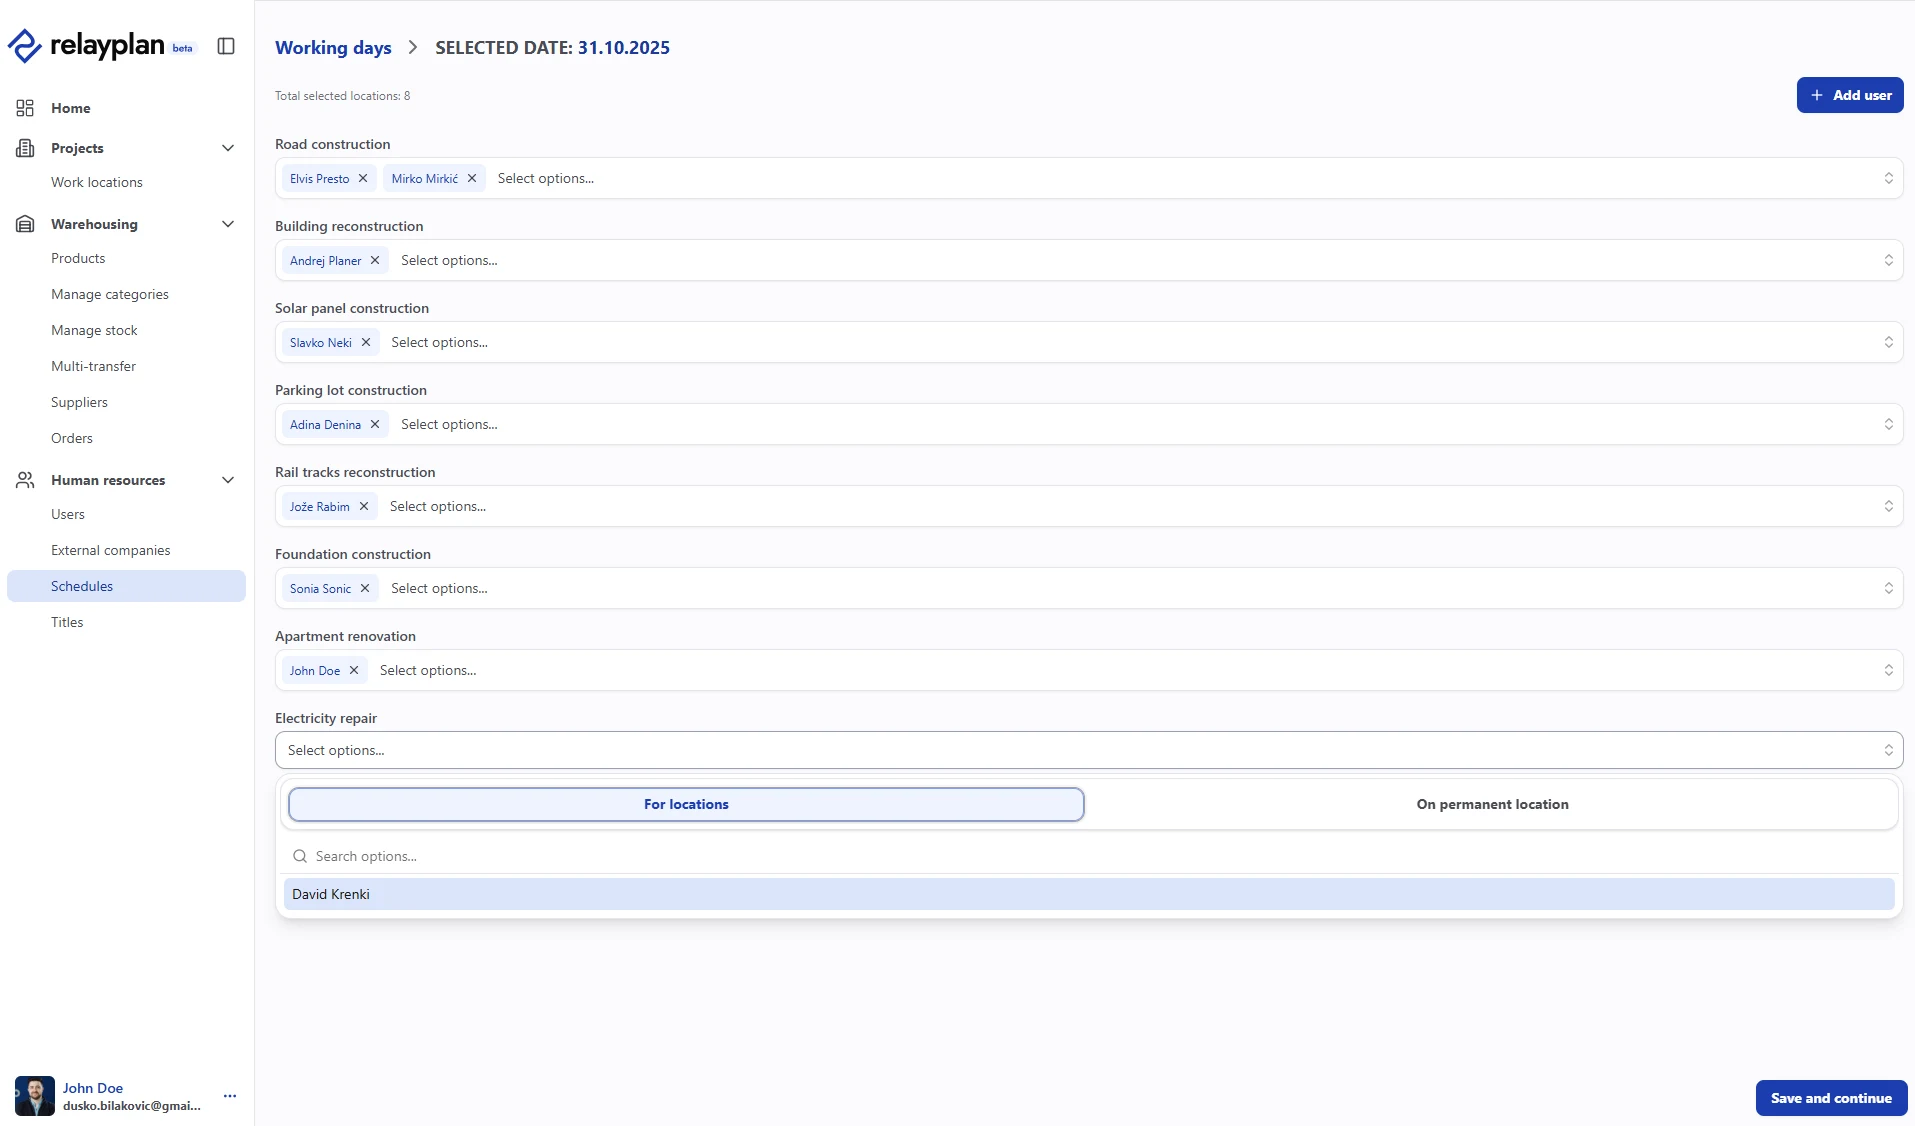
Assign people to a cost center
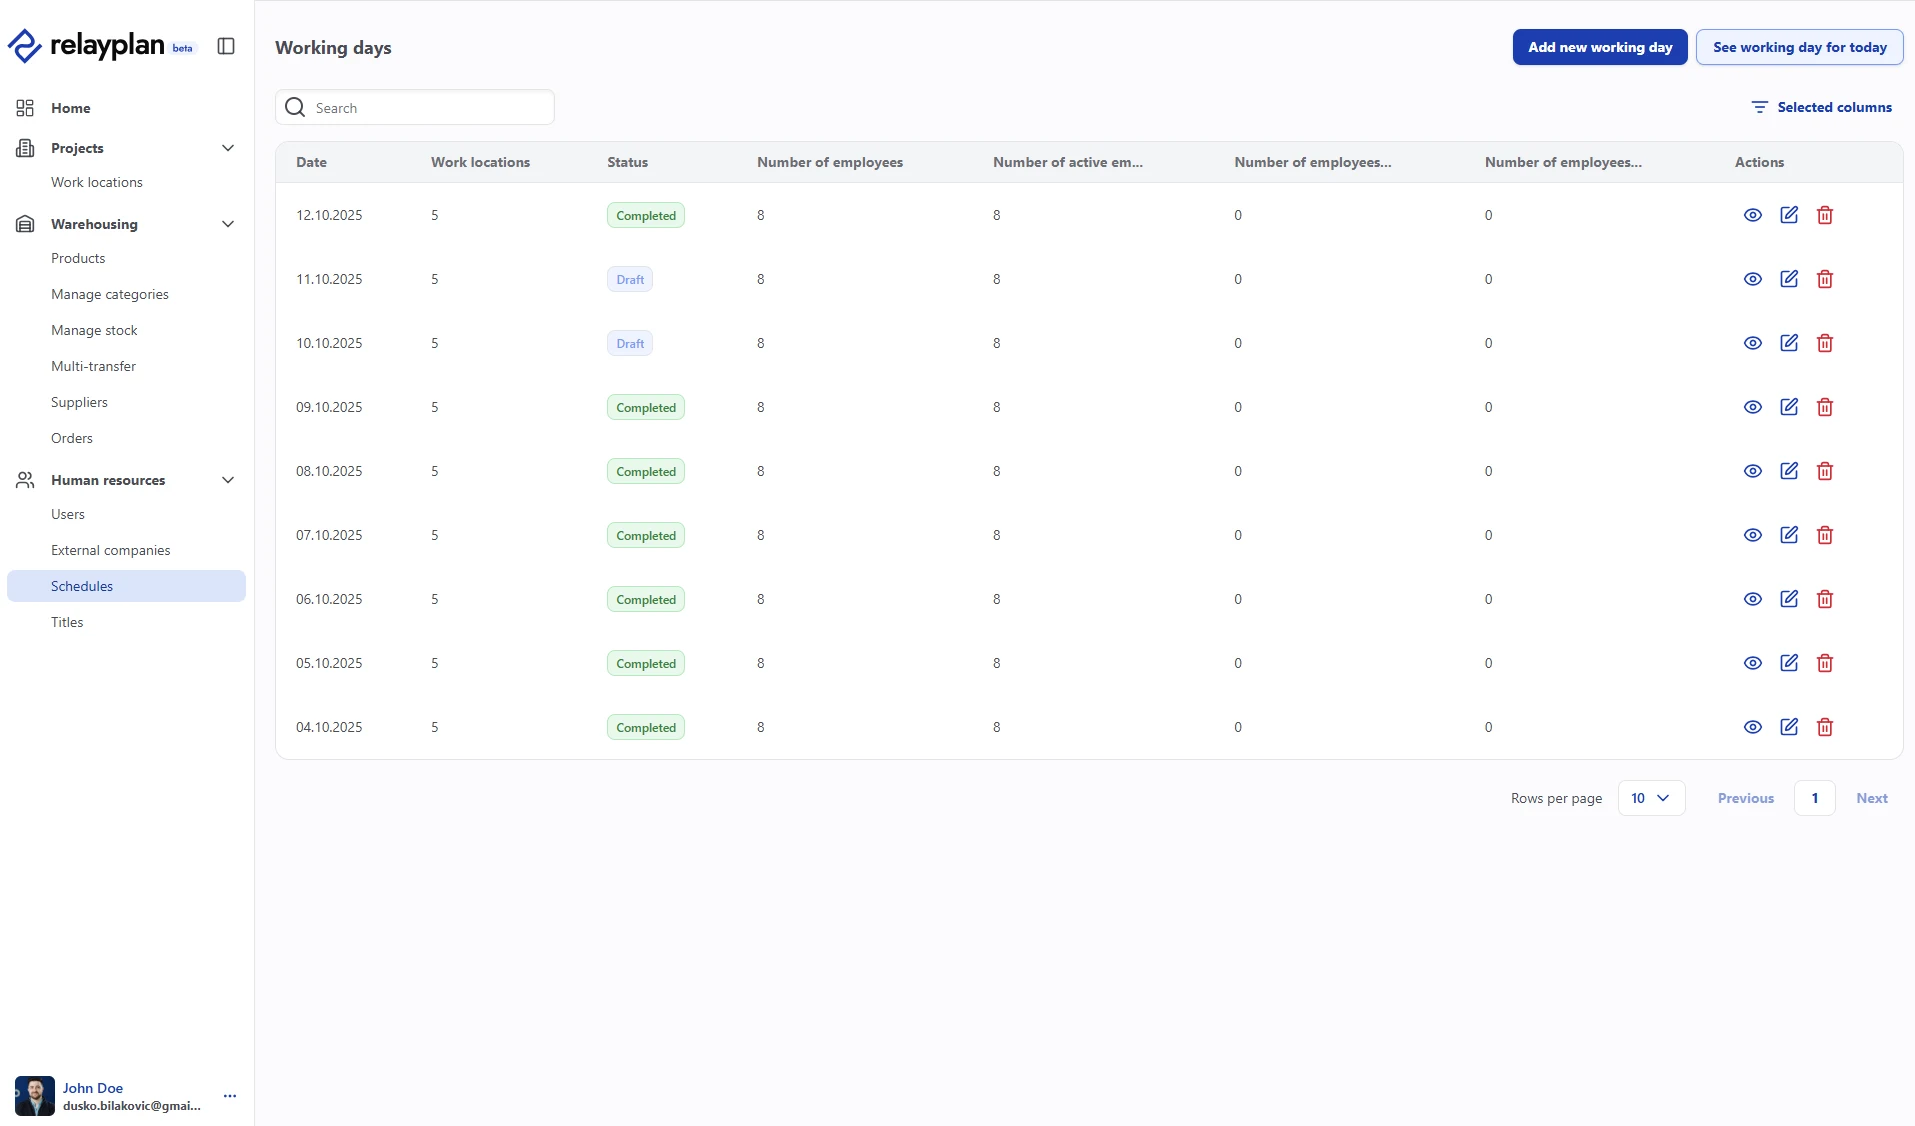
You can copy an existing workday and then adjust it, which is much faster than building a repeating schedule from scratch.
Vehicles
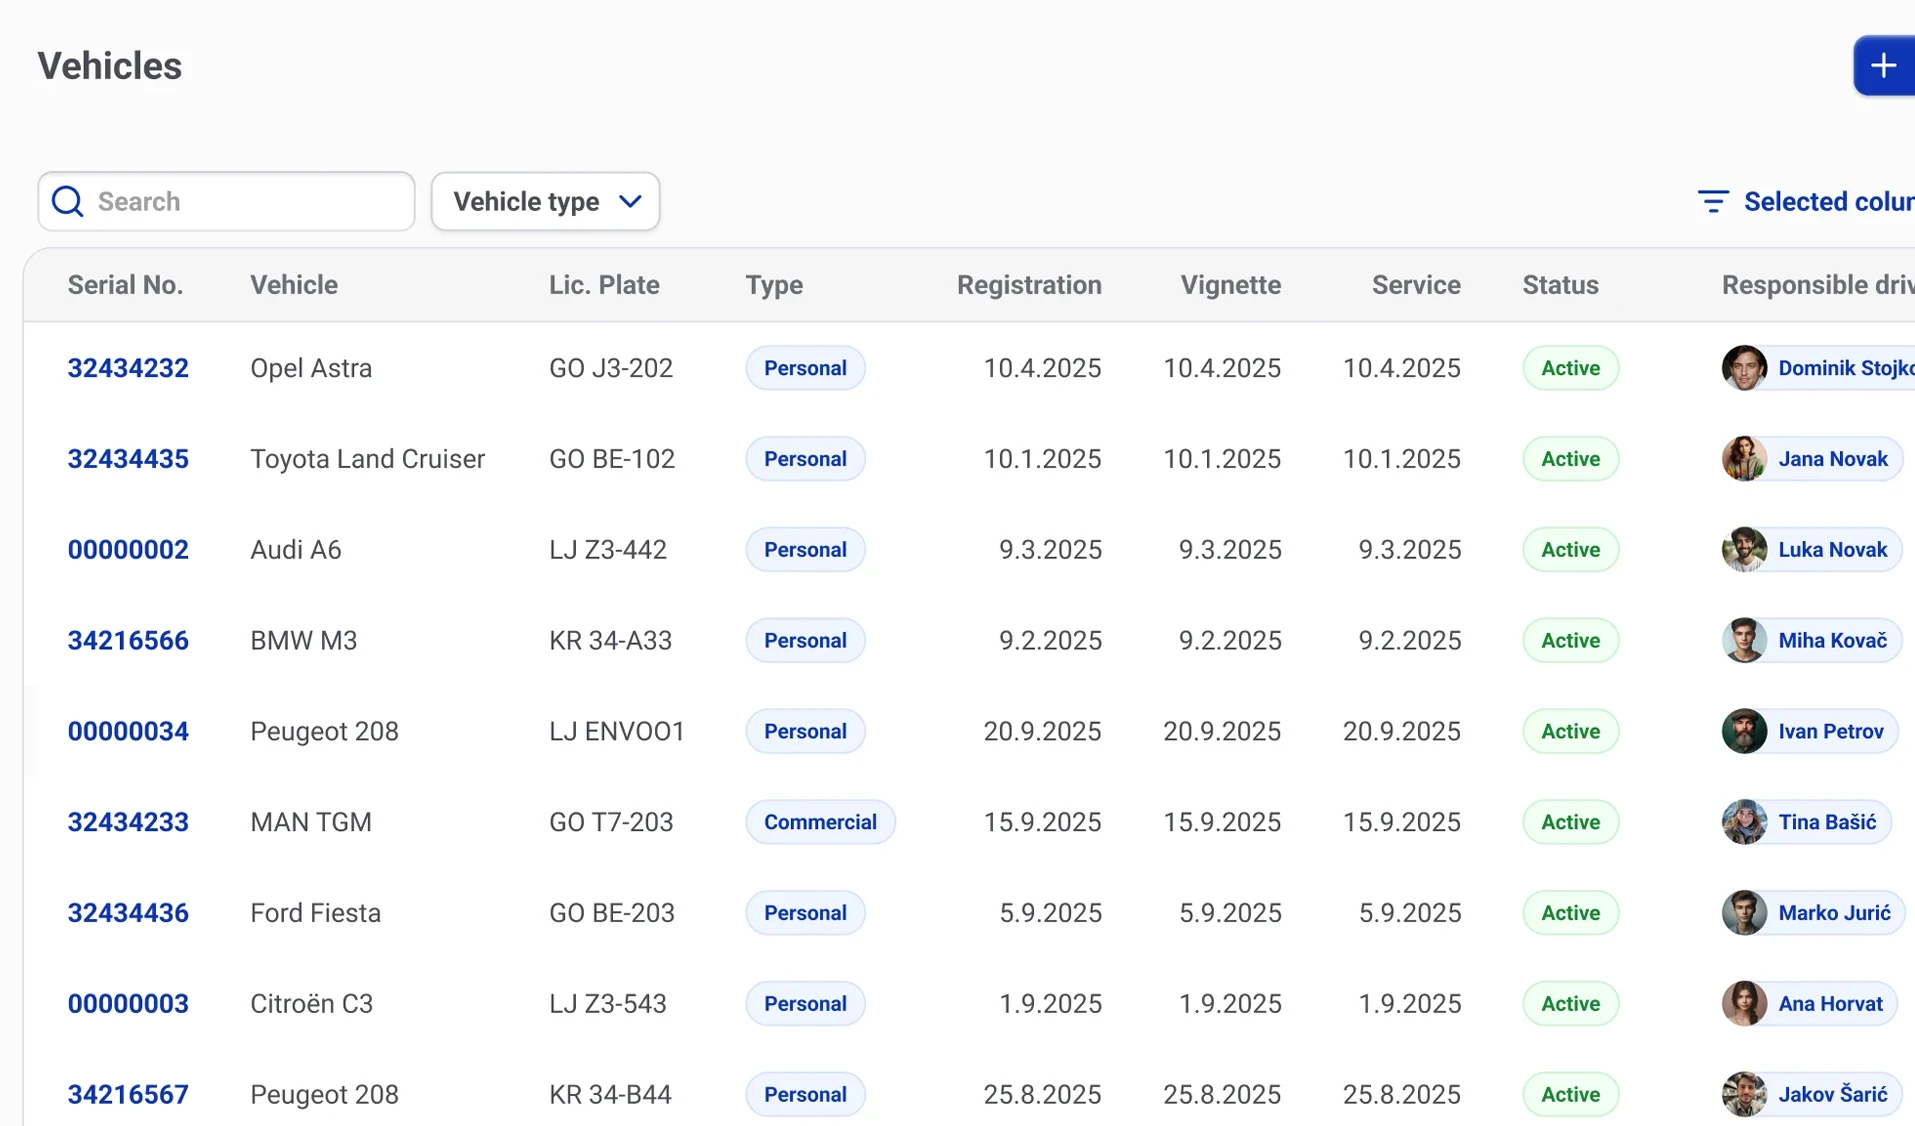
The Vehicles module connects your fleet to the costs and usage it generates, so a van or machine stops being an invisible overhead and becomes a traceable line in your project costs.
What the module covers
- Review vehicles with their basic information — make, plate, type and registration date.
- View usage history and assign a vehicle to an employee for a defined period.
- Receive reminders about upcoming technical inspections and registration renewals.
- Enter service and insurance costs, and track annual cost per vehicle.
- When costs grow large, the system flags the vehicle for a replacement or feasibility review.
Add a vehicle
Services & running costs
- Record services with the date, type, amount and an attached invoice.
- Track refuelling with the date, quantity, price and location.
Equipment & personal stock
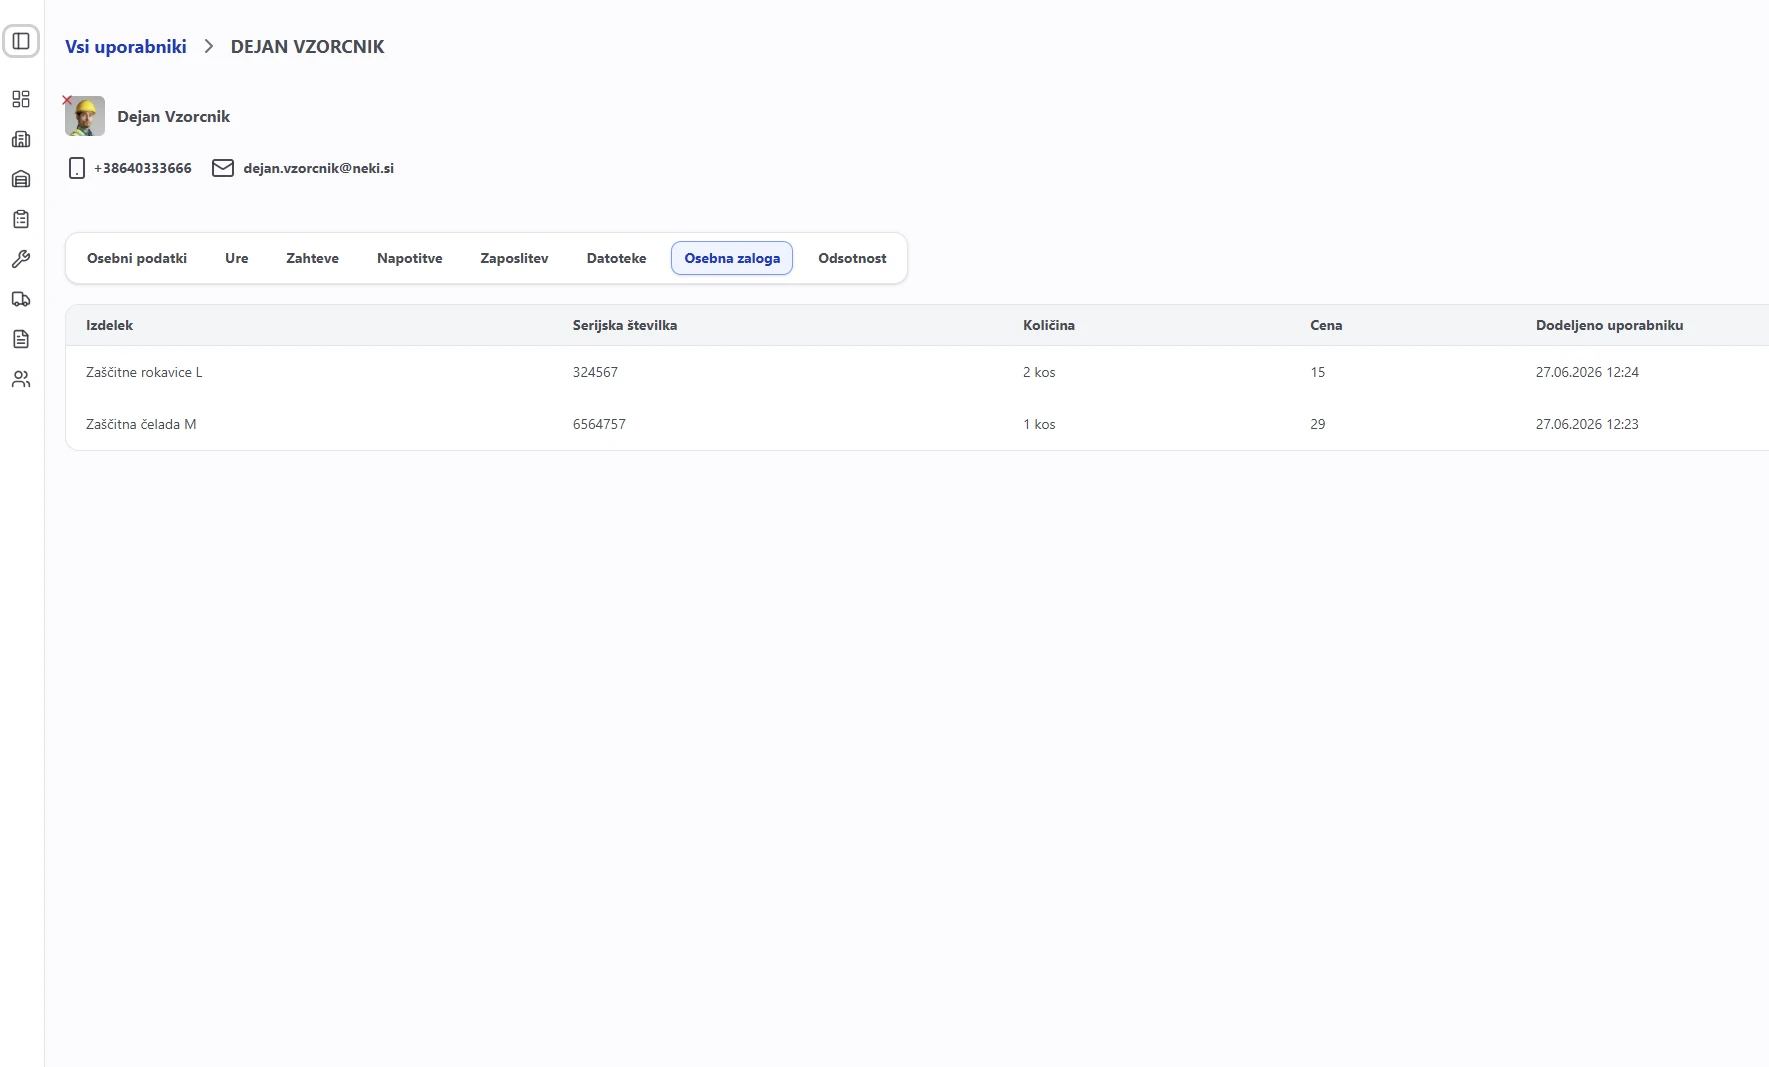
Tools, personal protective equipment and other work equipment are handled as personal stock — material assigned to a named employee rather than sitting in a warehouse.
Because each item has a keeper, it is always clear who holds what. Employees can see their own equipment and materials in the mobile app, which removes most of the "who has the drill" conversations.
Issue equipment to an employee
When equipment comes back, record it as a Return so it leaves the employee's personal stock and rejoins the warehouse. See Warehouse.
Reports & analytics
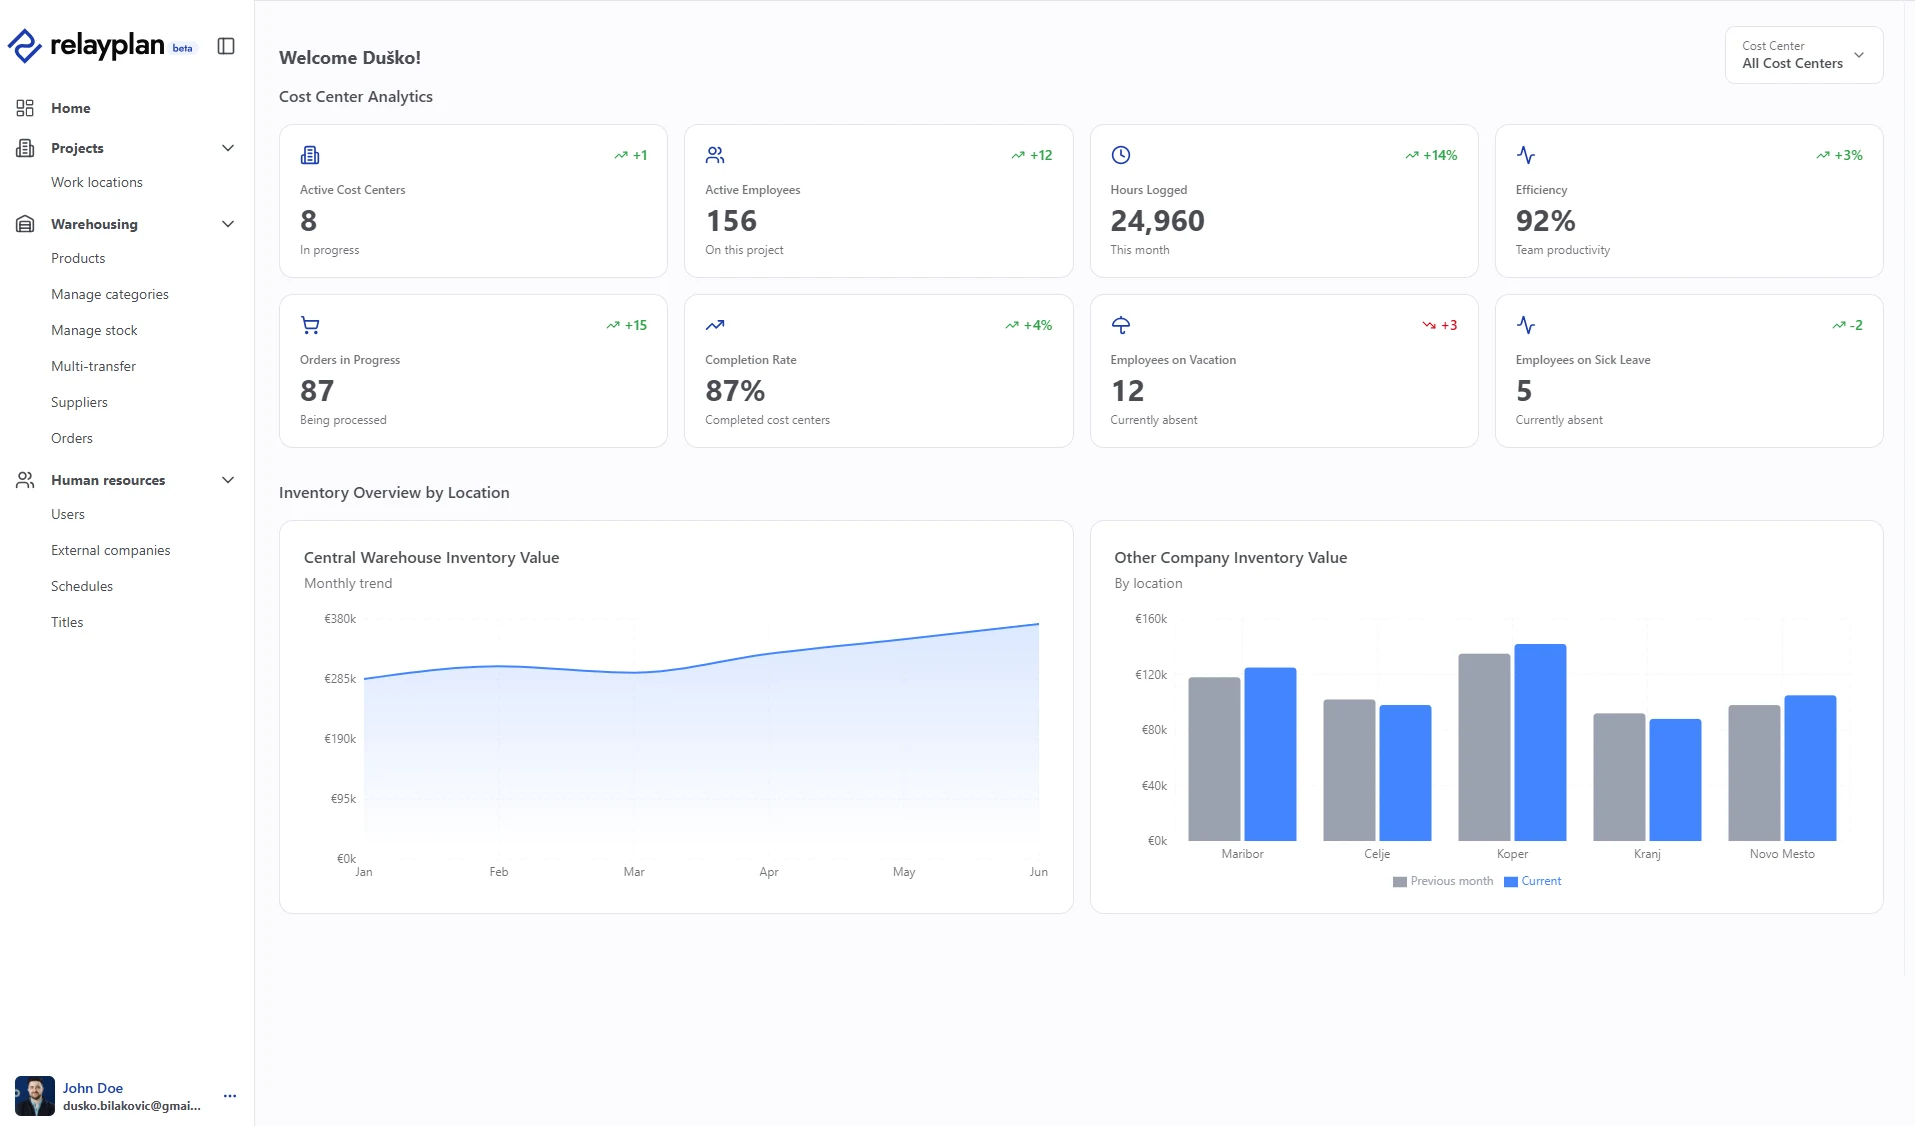
Detailed reporting brings hours, material consumption and profitability together per cost center, so you can compare what was planned against what actually happened.
Key reports
Exporting a report
System settings
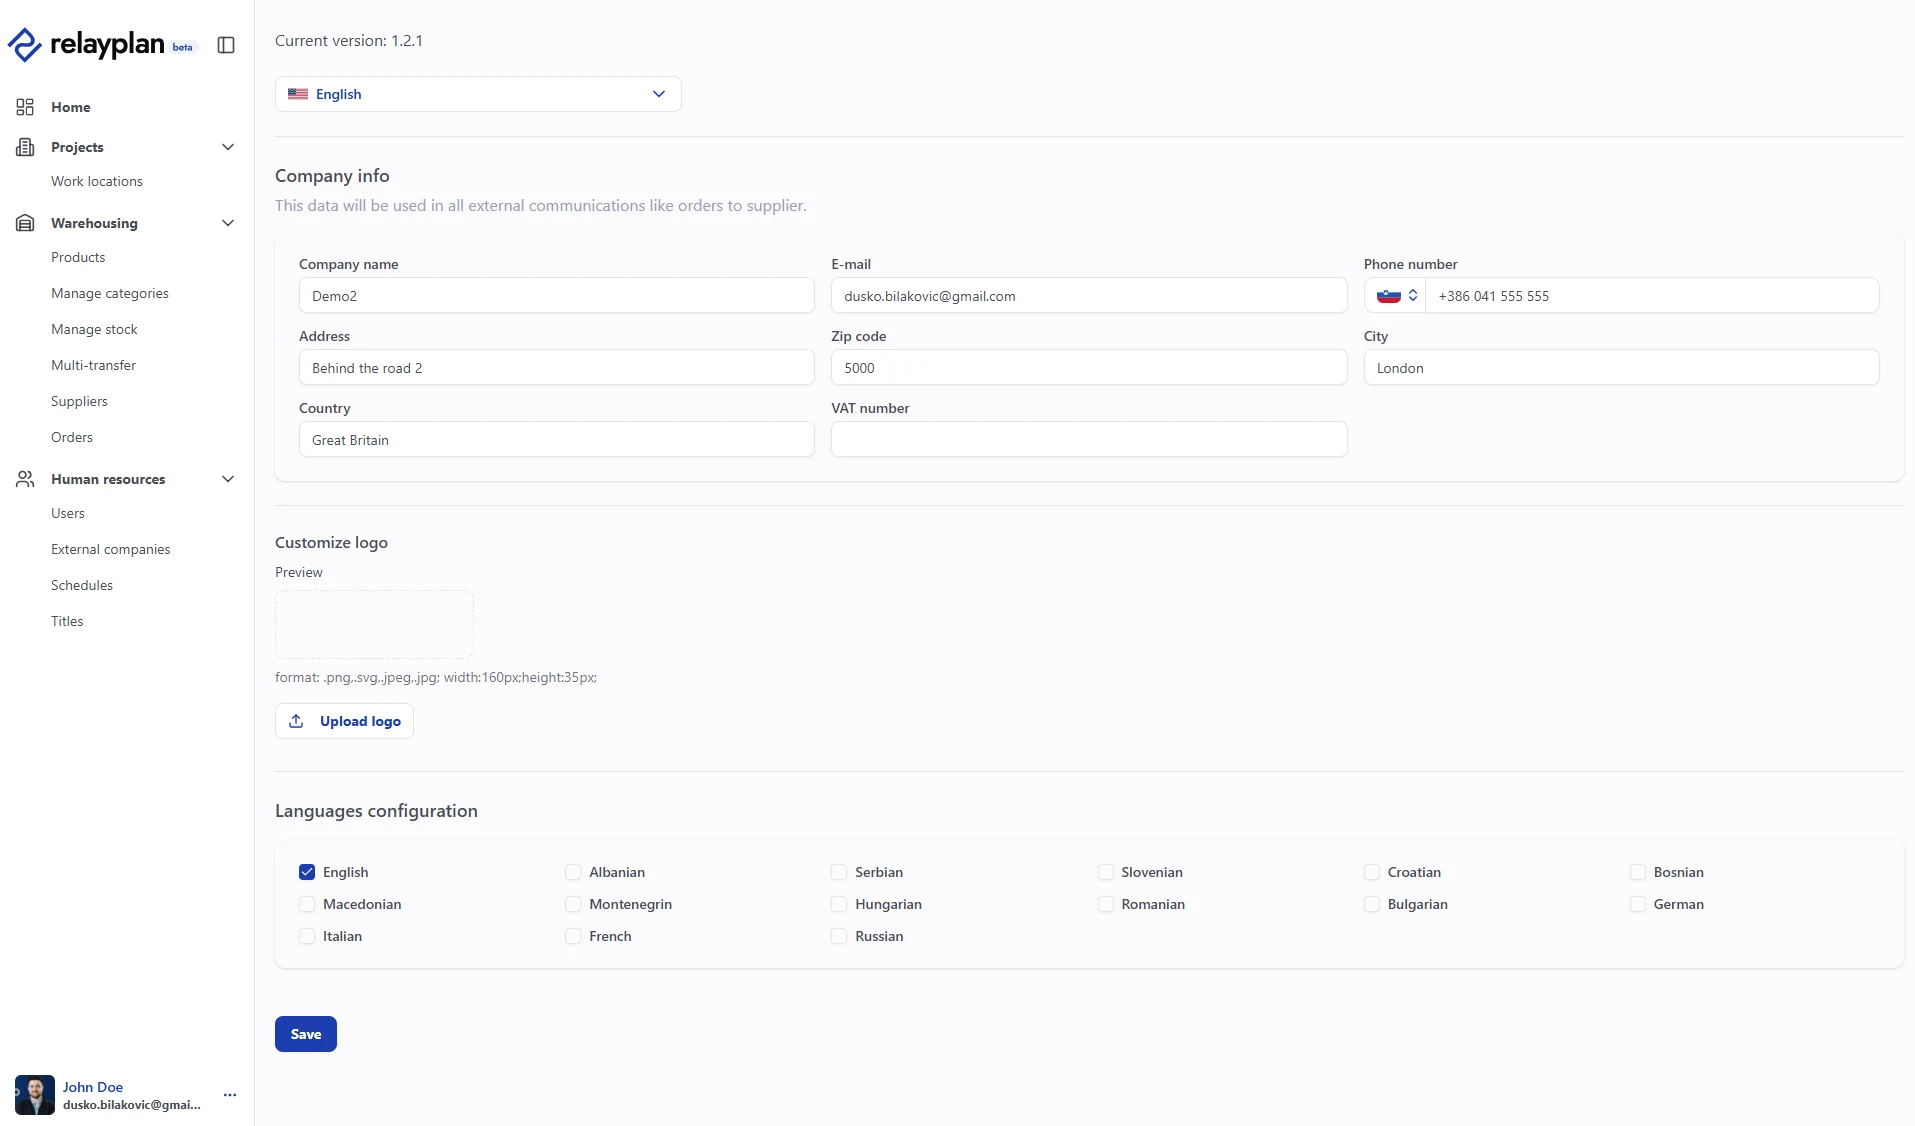
Set your basic company data, choose which languages are available to your users and employees, add your logo, and pick the interface language.
Mobile app
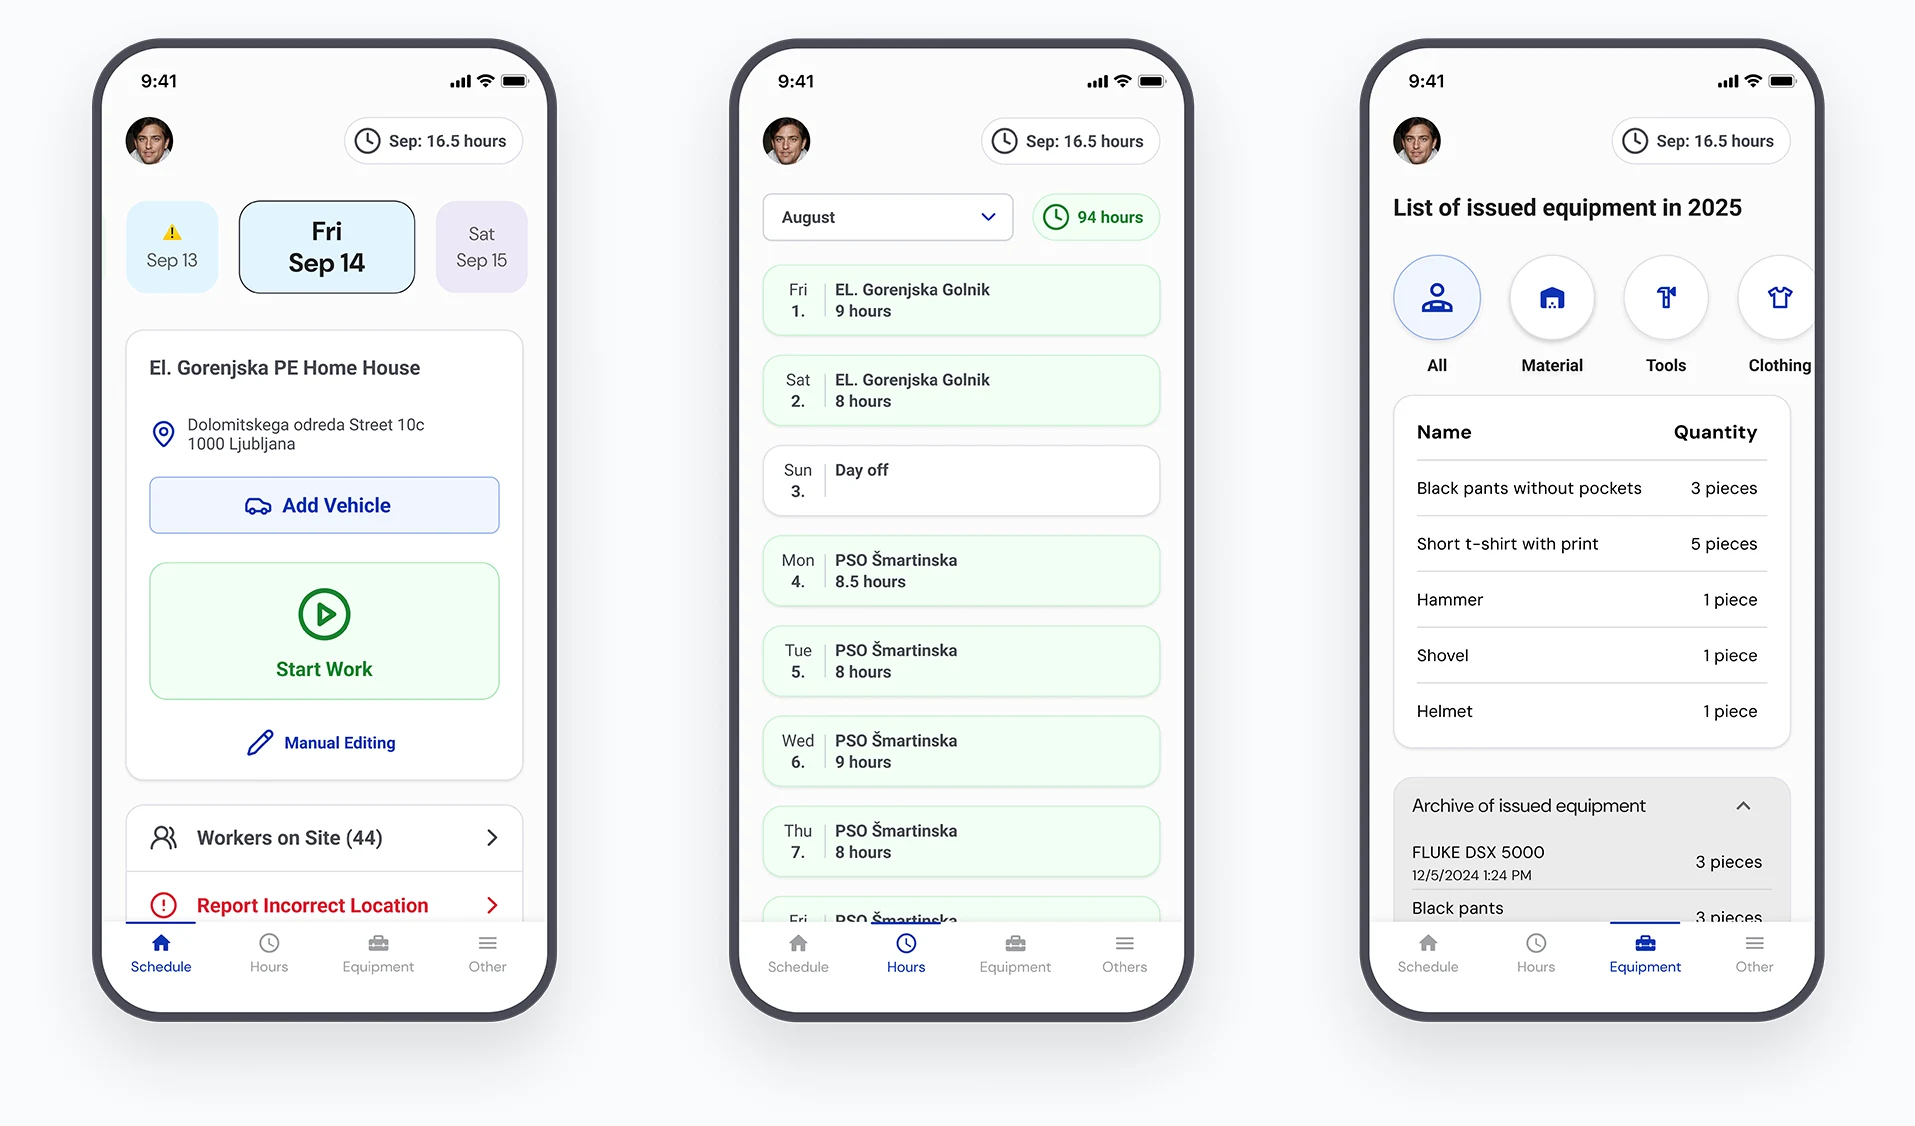
The mobile app makes time tracking simple, automated and paperless. Employees record arrivals, departures, lunch breaks and sick leave, and clock in from remote locations. They can also see their personal equipment, materials and tools, record refuelling, and note when they are using a vehicle.
Sign in
Register hours in the field
- Start the workday with one tap.
- Log lunch with one tap — the system records 30 minutes automatically.
- End the workday with one tap.
- Edit the current day manually if something needs correcting.
- Review your own recorded hours at any time.
- Choose your language.
- Request holiday Soon
- Mark sick leave Soon
- Log refuelling Soon


Glossary
Frequently asked questions
Follow the order in Get started: add users, create a cost center, enter your base items into the warehouse, then start tracking hours.
The source of truth is the status shown in the orders list. See Orders.
In Reports & analytics, select the report you need, set your filters and click Export.
Module availability depends on your subscription plan and on the role assigned to your account. If a module is missing from your left menu, check both with your administrator.
No. Administrators cannot remove the rights of, or change the password of, another administrator. See Users & roles.
Usually your company name — the same word that appears in your web address, for example the company part of company.relayplan.app.
Still stuck?
Request a live walkthrough and one of our agents will show you how to set RelayPlan up around the way you already work.